Blackboard (Faculty) - Banners: Add a Banner to Your Blackboard Course
Banners are a good way to "brand" your course. A banner is an image that appears at the top of your Home Page (Announcements, Planner page, or Content Area) . If you use a Course Pack in conjunction with your text book, you probably already have a banner included. If you do not, you can create your own.
Adding A Banner
- To add a banner, from the Control Panel, click on Customization, then click Teaching Style.
- Scroll to the bottom of the page under the heading "Select Banner."
- Click the Browse My Computer button.

- Navigate to the desktop or folder with the banner image.
- Click the Open button.
- Add Banner Alt Text.
- Click the Submit button at the bottom of the page.
- Navigate to your home page to view the banner.

Create a Banner
Banners are a good way to "brand" your course. If you use a Course Pack in conjunction with your textbook, you probably already have a banner included. If you do not, you can create your own. A banner is an image that appears at the top of the Home page (Announcements, Planner, Coursework, etc.).
Create the Banner
Images should be no larger than 700 pixels (7 inches) wide and 100 pixels (1 inch) tall. The image should be a .jpg or .png format with a resolution of 72 - 100 dpi.
PowerPoint
- Open PowerPoint
- From the "Design" tab, click on Slide Size, then click Custom Slide Size.
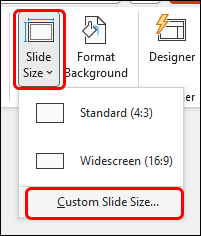
- From the Slide Size box, click on the drop-down menu for "Slides sized for:" and select Custom.
- Change the Width to 7 inches and the Height to 1 inch. Confirm that the slide is in Landscape mode.

- Click OK.
- Click Ensure Fit.

- Add your text, add a background, add any images.
- From the "File" tab, click on Export.
- Click on Change File Type.

- Under Image File Types, select PNG or JPEG file type.

- Click Save As button.
- In the "File name" box, give the file a name.
- In the "Save as Type" box, the file type you chose should default there. If not, click on the Save as Type: to select the .png or .jpg file type.
- Click Save.
- Click on the "Just This One" box (unless you have created more than one banner).
Add A Banner to Blackboard
Banners are a good way to "brand" your course. A banner is an image that appears at the top of your Home Page (Announcements, Planner page, or Content Area) . If you use a Course Pack in conjunction with your text book, you probably already have a banner included. If you do not, you can create your own.
Adding A Banner
- To add a banner, from the Control Panel, click on Customization, then click Teaching Style.
- Scroll to the bottom of the page under the heading "Select Banner."
- Click the Browse My Computer button.
- Navigate to the desktop or folder with the banner image.
- Click the Open button.
- Add Banner Alt Text.
- Click the Submit button at the bottom of the page.
- Navigate to your home page to view the banner.
Create a Banner
Banners are a good way to "brand" your course. If you use a Course Pack in conjunction with your textbook, you probably already have a banner included. If you do not, you can create your own. A banner is an image that appears at the top of the Home page (Announcements, Planner, Coursework, etc.).
Create the Banner
Images should be no larger than 700 pixels (7 inches) wide and 100 pixels (1 inch) tall. The image should be a .jpg or .png format with a resolution of 72 - 100 dpi.
PowerPoint
- Open PowerPoint
- From the "Design" tab, click on Slide Size, then click Custom Slide Size.
- From the Slide Size box, click on the drop-down menu for "Slides sized for:" and select Custom.
- Change the Width to 7 inches and the Height to 1 inch. Confirm that the slide is in Landscape mode.
- Click OK.
- Click Ensure Fit.
- Add your text, add a background, add any images.
- From the "File" tab, click on Export.
- Click on Change File Type.
- Under Image File Types, select PNG or JPEG file type.
- Click Save As button.
- In the "File name" box, give the file a name.
- In the "Save as Type" box, the file type you chose should default there. If not, click on the Save as Type: to select the .png or .jpg file type.
- Click Save.
- Click on the "Just This One" box (unless you have created more than one banner).
Add A Banner to Blackboard
Banners are a good way to "brand" your course. A banner is an image that appears at the top of your Home Page (Announcements, Planner page, or Content Area) . If you use a Course Pack in conjunction with your text book, you probably already have a banner included. If you do not, you can create your own.
Adding A Banner
- To add a banner, from the Control Panel, click on Customization, then click Teaching Style.
- Scroll to the bottom of the page under the heading "Select Banner."
- Click the Browse My Computer button.
- Navigate to the desktop or folder with the banner image.
- Click the Open button.
- Add Banner Alt Text.
- Click the Submit button at the bottom of the page.
- Navigate to your home page to view the banner.
Create a Banner