Starfish - How to Set Office Hours (Faculty & Staff)
Explains how to set your office hours in Starfish. Students may only schedule appointments with you during times you have designated as available,
through your office hours.
1. Login to Starfish
2. Click the three horizontal lines in the top left of the screen to open the menu:
3. Click the Appointments tab:

4. Click the Office Hours button:

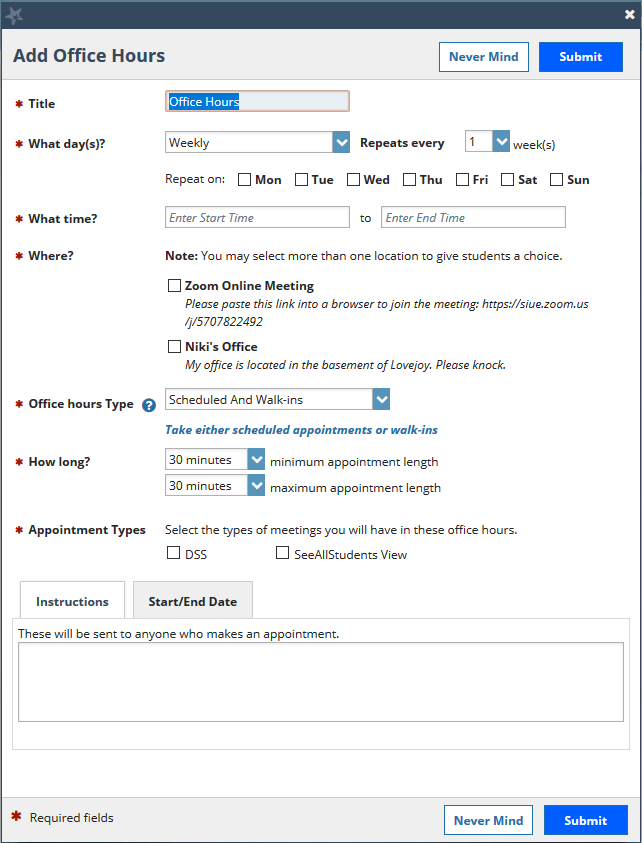
5. This window provides the following options:

- Title: Enter a name for this block of time. Students will see this name when they view your calendar. The title will also help you keep track of different types of office hours you have established.
- What day(s)?: Select days for this block of time and indicate any recurrence (e.g. Repeats every 1 week).
- What time?: Use these fields to enter the start and end time for the office hours.
- Where?: Select where meetings will be held using the checkbox(es) next to your location(s). The location options are pulled from the Appointment Preferences section of your profile. If you choose more than one location, the student will be able to choose his/her preferred location for the meeting. To add additional location options, go to the Appointment Preferences section of your profile.
- Office Hour Type:
- Walk-ins Only: select this option to show the time as available to students, but disallow anyone from making advance appointments.
- Scheduled and Walk-ins: If you want students to have the option of making an appointment during this time.
- Scheduled Appointments Only: Select this if you will not take any walk-ins.
- How long?: Select how long meetings can be by selecting a minimum and maximum duration. If the minimum and maximum are identical, the student will not be given a choice of duration.
- Appointment Type: If your role has permissions to add more than one appointment type, you will see checkboxes that allow you to select which types apply to this block of time.
- Instructions: Use the instructions box to enter instructions to students scheduling with you during this block of time. Instructions are required for blocks that allow Walk-ins.
- Start/End Date: Set a time frame for a repeating office hour block. It's recommended that you choose End of Term for end date as office hours often change each term. This means you will need to set new office hours in Starfish each term.
Repeat these steps for different blocks of office hours.
6. Click the Submit button at the top or bottom of the Add Office Hours form to save your Office Hour block.
More resources can be found on the Starfish webpage here: http://www.siue.edu/its/starfish/
