YuJa (Students) - Record a Video and Submit for an Assignment in Blackboard Ultra
Record Your Video
Choose one of the methods below to record a video with YuJa.
Recording Using the YuJa Software Capture Tool (PC)
- Log into YuJa at https://siue.yuja.com/.
- Click on Create Recording at the top of the page.

- Select Software Capture, then click Launch Application.


- If you need to download the software, select download and follow the steps below:
Then click Open YuJa Software Capture button.
- Now you will see the Yuja Software icon on your desktop

Software Capture Settings
- The YuJa Software Capture window opens.

- YuJa will notify you if updates are needed.
Follow these instructions for more details: Updating to the Latest Version of the YuJa Software Capture for PC Application.
Menu

2. Audio: input microphones
3. Screen: software on your computer, such as PowerPoint
4. Live stream: We currently do not subscribe to this option
5. Profile: You can change your settings and save them as a Profile.
Main Window

Menu Options
Video
Click on the drop-down arrow next to Video. The first video source will default to your integrated webcam within your device. That may be changed to an external webcam or other video camera within your system. The Video Source 2 must be toggled on to work. This could be an additional front facing webcam to capture the classroom or another video source within your system. If you need assistance setting this up, please contact the ITS Help Desk at 650-5500.

Audio

Screen
The Screen source is your primary computer screen display. If you have more than one monitor, click on Advance Settings and select Duo Displays. If you need assistance setting this up, please contact the ITS Help Desk at 650-5500.
Profile

Record
- Once you have your video, audio, and screen settings saved, click the Start button. Remember, you will be able edit the video when you have finished, so don't worry about extra video at the beginning or end.

YuJa will provide you with a 3 second countdown. Don't worry if you don't start right away. You can later trim off any extra video at the beginning or end. - The control screen will minimize and the YuJa Capture icon will appear in your toolbar. Click on the YuJa Capture icon to open the capture window.

Click the "pause" button if you wish to pause the recording. When you click the pause button again, you will continue with the recording.
Click the "Finish" icon when you are finished recording.
- Click the "Save" button to begin the upload of your video to YuJa.

- A status bar will appear on your screen. When the status reads 100%, return to YuJa for post-production editing/captioning/linking.

Recording Using the YuJa Software Capture (Mac)
- Log into YuJa at https://siue.yuja.com/.
- Click on Create Recording at the top of the page.

Software Capture Settings

Menu

2. Audio: inputs microphone
3. Screen: software on your computer, such as PowerPoint
4. Live stream: we currently do not subscribe to this option
5. Profile: you can change your settings and save as a Profile.
Main Window

Menu Options
Video
Click on the drop-down arrow next to Video. The first video source will default to your integrated webcam within your device. That may be changed to an external webcam or other video camera within your system. The Video Source 2 must be toggled on to work. This could be an additional front-facing webcam to capture the classroom or another video source within your system. If you need assistance setting this up, please contact the ITS Help Desk at 650-5500.
Audio


Screen
The Screen source is your primary computer screen display. If you have more than one monitor, click on Advanced Settings and select Duo Displays. If you need assistance setting this up, please contact the ITS Help Desk at 650-5500.
Profile

Record
1. Once you have your video, audio, and screen settings saved, click the Start button. Remember, you will be able to edit the video when you have finished, so don't worry about extra video at the beginning or end.
YuJa will provide you with a 3-second countdown. Don't worry if you don't start right away. You can later trim off any extra video at the beginning or end.
2. A small toolbar will appear on your screen. Click the "pause" button if you wish to pause the recording. When you click the pause button again, you will continue with the recording.
Click the "Finish" icon when you are finished recording.

3. Click the "Save" button to begin the upload of your video to YuJa.


Record Media Via the Mobile App
Record New Media (Video or Audio) with the YuJa App
- Click the YuJa Video icon on your mobile device. Use the Single Sign-On option and your SIUE email and password.

- At the bottom of the screen, click the plus + icon.

- Click Record Content.

- Choose Video or Audio on the menu at the bottom. Click the reverse camera icon if necessary to switch to the camera to the front if you need yourself on camera. Click the Record button (red circle) when ready to record. If recording yourself, frame yourself in the frame. Make sure that you are well-lit and there are no distractions in the background.

- Record your media. Remember, you will have the option to edit once it is uploaded to YuJa. Click the circle icon to end the recording.
- Click Use to save or Retake to redo.
- Press the play button to review. Optionally, give the video a title to better identify it when you are in YuJa. When you are satisfied, click the Upload button to send your video to YuJa. If you do not have wifi available and want to upload later, you may do that. The media is stored in the YuJa app and may be uploaded at a later time.
Upload an Existing Video with the YuJa Video App
- Click the YuJa Video icon on your mobile device. Use the Single Sign-On option and your SIUE email and password.
- At the bottom of the screen, click the plus + icon.
- Click Upload from Library or Upload From Files.
- Navigate to find the media you want to upload. Click the media you want to upload.
- Press the play button to review. Optionally, give the video a title to better identify it when you are in YuJa. When you are satisfied, click the Upload button to send your video to YuJa. If you do not have wifi available and want to upload later, you may do that. The media is stored in the YuJa app and may be uploaded at a later time.
Record Video with YuJa Browser Capture Tool (PC and Mac)
- From the Media Library, click on the Create Recording button.

- A pop up window titled Create Recording will appear. In it click Browser Capture.

- Click the Launch Application button.
- A new browser window will open with the Browser Capture Studio. On the left are your Browser Capture Options. On the bottom of the new window are the Browser Capture Studio options.

- Recording Options:
Microphone: The available microphones will appear in the expandable menu.
Camera: Display only the default web cam in the record window. To change from one web cam to another, click expand the menu.
Present: A secondary window will appear listing the open tabs and windows available to share during the recording. An option to share your entire screen is available too. You have the option to share audio with tabs only.
PIP: PIP stands for Picture-In-Picture and A window will pop up allowing you to minimize or maximize either the window or tab you are sharing or your camera feed. Select the Window or Screen from the drop down menu
Click the Start Recording button when all options are set. - Record the video. Once the video is complete, click the Stop Recording button.
- Once you have finished recording, a new window will pop up with the status of your video's upload to YuJa. Click the Watch Video button to preview your video. Click the New Recording to record another video. Click Go to My Media to visit your media collection on SIUE's YuJa instance.
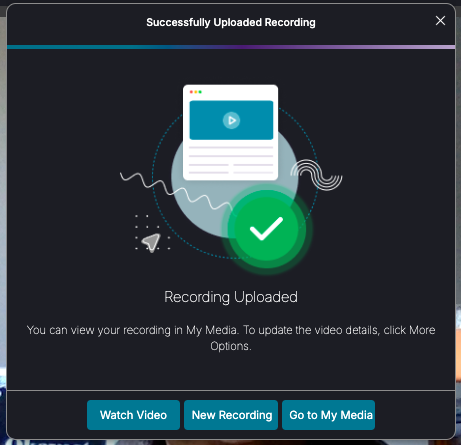
- When the upload is complete, you can return to the YuJa Media Library to edit your video.
Upload Your Video To YuJa
Upload Media to YuJa
Upload Media
- If you haven't already, create folders to keep your media organized. See the Knowledge Base Article "Create a Folder" for more information.
- Navigate to the folder in which you will upload your media. Double click on that folder.
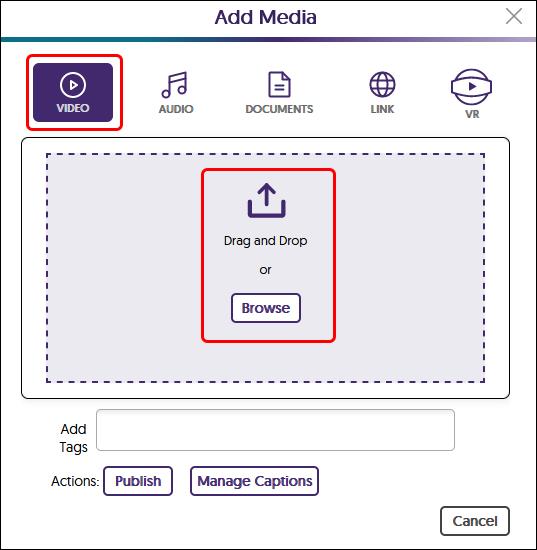
- Drag and drop your media directly into the window or click the Upload button.

4. If you are uploading video, make sure the "Video" icon is selected. If you are uploading audio, make sure the "Audio" icon is selected.
*Avoid using YuJa for uploading documents; OneDrive is a better storage solution for documents.
5. Drag and drop your media into the box or click the upload button. Navigate to your media file and upload it.
6. Please wait until the status window at the bottom of the page states Finished Uploading. This upload process may take some time depending upon the size of your media. Once the upload is finished, you will see a thumbnail of the media processing. Do not do anything to that media until it is finished processing. You may upload more media or do other actions while that video is processing.
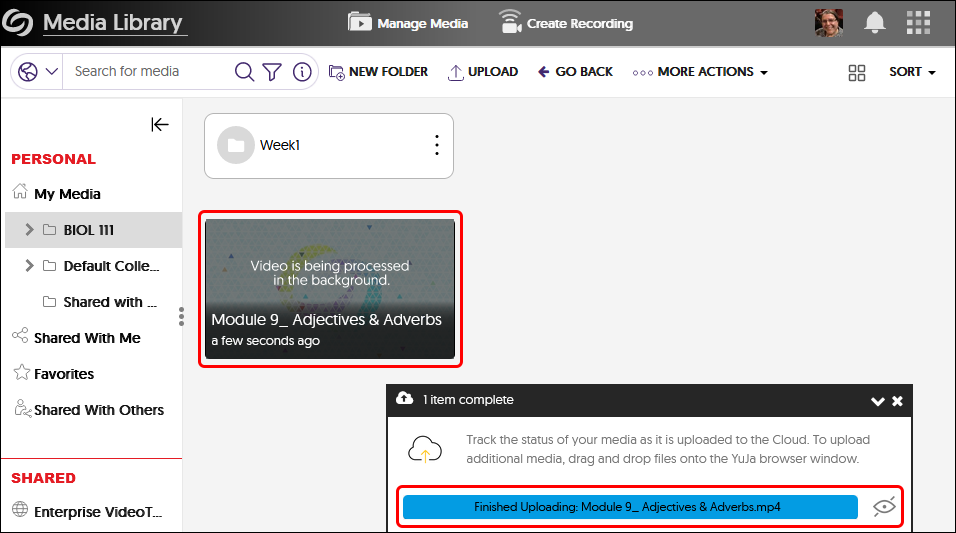
7. Once the media is processed, you will see a thumbnail image, the length of media ("4:39" in image below), and length of time since upload ("3 minutes ago" in the image below).
Once the media is uploaded, you may continue editing, linking, sharing, etc.
Link Your Video in Blackboard Ultra
Link or Embed Video in Blackboard
Linking to a Video
Linking to a video allows users to click on a URL that will take them directly to the video on YuJa or view a video in Blackboard if using the Embed Media option.
- Navigate to the video on YuJa.
- In YuJa, find the "More" option listed in the thumbnail menu.

- Locate "Link" on the video menu.

- Click the "Direct Link" option.
- Copy the entire direct link by clicking on the overlapping squares on the right side of the Direct Link field.

- In Blackboard Ultra, navigate to the content area where you want to add the link (e.g., discussion board, assignment submission).
- Click the Insert Link button (chain link).

- Select "Embed Media".
- In the "Link URL" field, paste the video's URL.

- Add a title for the link in the "Link text" field.
- Click "Insert".
- Click "Post" on the Insert/Edit Content window.

Embedding a Video
Embedding a video allows the video to play directly within the Blackboard Ultra content area without navigating away from the page.
- Navigate to the video on its hosting platform (e.g., YuJa).
- In YuJa, find the "More" option listed in the thumbnail menu.
- Locate "Link" on the video menu.
- Click the "Embed Code" option. This will typically display HTML code.
- Copy the entire embed code by clicking on the overlapping squares on the right side of the Embed Code field.

- In Blackboard Ultra, navigate to the content area where you want to embed the video.
- Click the Add Content button (a plus sign inside a circle).

- Select the "Embed Media".
- Paste the embed code into the "Media link" field.

- Add a short description in the "Alternative Text" field.
- Click "Insert".
- Click "Post" on the Insert/Edit Content window.
Troubleshooting
- Video Not Playing: Ensure the video's privacy settings on the hosting platform allow embedding. Private videos may not play within Blackboard.
- Incorrect Embed Code: Double-check that you have copied the complete embed code from the hosting platform.
Need Additional Support?
If you have any questions or need further assistance, please contact the ITS Help Desk:
- Call: (618) 650-5500
- Email: help@siue.edu
- Visit: Lovejoy Library Room 0005 during regular business hours.
This guide aims to provide useful information, but as technology changes, interfaces or steps might vary. Please use the Comment button to let us know if anything differs from your experience. Your feedback helps us keep this information accurate. Thank you!