YuJa (Students) - Record a Video and Submit for an Assignment
This article contains information on record a video in YuJa and link to it in a Blackboard discussion board.
Record Your Video
Recording Using the YuJa Software Capture Tool (PC)
- Log into YuJa at https://siue.yuja.com/.
- Click on Create Recording at the top of the page.
- Select Software Capture, then click Launch Application.


- If you need to download the software, select download and follow the steps below:
Then click Open YuJa Software Capture button. - Now you will see the Yuja Software icon on your desktop

Software Capture Settings
- The YuJa Software Capture window opens.
- YuJa will notifiy you if updates are needed.
Follow these instructions for more details: Updating to the Latest Version of the YuJa Software Capture for PC Application.
Menu
Click on any of the drop-down arrows to expand the menu for the item.

1. Video: inputs such as web cams, document cams, etc.
2. Audio: inputs microphone
3. Screen: software on your computer, such as PowerPoint
4. Live stream: we currently do not subscribe to this option
5. Profile: you can change your settings and save as a Profile.
2. Audio: inputs microphone
3. Screen: software on your computer, such as PowerPoint
4. Live stream: we currently do not subscribe to this option
5. Profile: you can change your settings and save as a Profile.
More information about these inputs below.
Main Window
6. Add a custom video title such as "Lecture Week 5"
7. Share to a media channel (SIUE does not utilize the media channels).
8. Select a folder in your Media Library to indicate where the video will be saved
9. Settings for recording, configuration, sources, watch point, and advanced settings.
10. YuJa Help
11. Check for Updates
12. Log out of YuJa
13. Video source such as web cam or document camera
14. Screen Sources such as browser or PowerPoint.
NOTE: If you are using a Smart Classroom and wish to have other inputs displayed, such as a document camera, or wish to know how YuJa works with your podium, please contact the ITS Help Desk at 650-5500.
Menu Options
Video
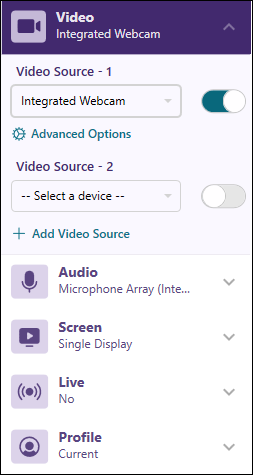
Click on the drop-down arrow next to Video. The first video source will default to your integrated webcam within your device. That may be changed to an external webcam or other video camera within your system. The Video Source 2 must be toggled on to work. This could be an additional front facing webcam to capture the classroom or another video source within your system. If you need assistance setting this up, please contact the ITS Help Desk at 650-5500.
Audio
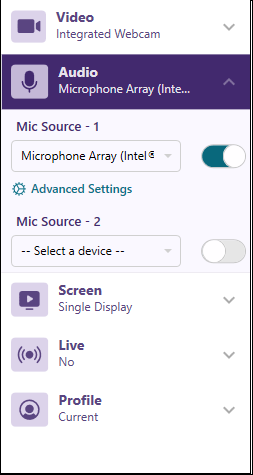
Screen
The Screen source is your primary computer screen display. If you have more than one monitor, click on Advance Settings and select Duo Displays. If you need assistance setting this up, please contact the ITS Help Desk at 650-5500.
Profile
If these are settings that you plan to use often, set a new profile, name it, and click the "Save" icon. Next time you record, click the Profile drop down list and select this profile.

Record
- Once you have your video, audio, and screen settings saved, click the Start button. Remember, you will be able edit the video when you have finished, so don't worry about extra video at the beginning or end.

YuJa will provide you with a 3 second countdown. Don't worry if you don't start right away. You can later trim off any extra video at the beginning or end. - A small toolbar will appear on your screen. Click the "pause" button if you wish to pause the recording. When you click the pause button again, you will continue with the recording.
Click the "Stop" icon when you are finished recording. - Click the "Save" button to begin the upload of your video to YuJa.
- A status bar will appear on your screen. When the status reads 100%, return to YuJa for post-production editing/captioning/linking.
Recording Using the YuJa Software Capture (Mac)
- Log into YuJa at https://siue.yuja.com/.
- Click on Create Recording at the top of the page.
3. Confirm the "Software Capture icon is selected. Click on the Launch Application button.

4. If you're using the YuJa Software Capture tool for the first time, you will need to select Download and follow these instructions: https://kb.siue.edu/117516
Software Capture Settings
1. The YuJa Software Capture window opens.

Menu
Click on any of the drop-down arrows to expand the menu for the item.

1. Video: inputs such as web cams, document cams, etc.
2. Audio: inputs microphone
3. Screen: software on your computer, such as PowerPoint
4. Live stream: we currently do not subscribe to this option
5. Profile: you can change your settings and save as a Profile.
More information about these inputs below.2. Audio: inputs microphone
3. Screen: software on your computer, such as PowerPoint
4. Live stream: we currently do not subscribe to this option
5. Profile: you can change your settings and save as a Profile.
Main Window

6. Add a custom video title such as "BIOL 111 Welcome"
7. Select a media channel
8. Select a folder in your Media Library to indicate where the video will be saved
9. Settings
10. The Help Center at YuJa.com
11. Check for updates
12. Camera output
13. Computer Screen output
NOTE: If you are using a Smart Classroom and wish to have other inputs displayed, such as a document camera, or wish to know how YuJa works with your podium, please contact the ITS Help Desk at 650-5500.Menu Options
Video
Click on the drop-down arrow next to Video. The first video source will default to your integrated webcam within your device. That may be changed to an external webcam or other video camera within your system. The Video Source 2 must be toggled on to work. This could be an additional front-facing webcam to capture the classroom or another video source within your system. If you need assistance setting this up, please contact the ITS Help Desk at 650-5500.
Audio

You will have to select YuJa Internal Audio for one of the mic sources if you plan to share your computer's sound in the recording. The first time you make that selection, you will be prompted to install the system audio recording package.

Screen
The Screen source is your primary computer screen display. If you have more than one monitor, click on Advanced Settings and select Duo Displays. If you need assistance setting this up, please contact the ITS Help Desk at 650-5500.
Profile

Record
1. Once you have your video, audio, and screen settings saved, click the Start button. Remember, you will be able to edit the video when you have finished, so don't worry about extra video at the beginning or end.
YuJa will provide you with a 3-second countdown. Don't worry if you don't start right away. You can later trim off any extra video at the beginning or end.
2. A small toolbar will appear on your screen. Click the "pause" button if you wish to pause the recording. When you click the pause button again, you will continue with the recording.
Click the "Finish" icon when you are finished recording.

3. Click the "Save" button to begin the upload of your video to YuJa.

4. A status bar will appear on your screen. When the status reads 100%, return to your YuJa library for post-production editing, captioning, and linking.

Record Media via the Mobile App
Record New Media (Video or Audio) with the YuJa App
- Click the YuJa Video icon on your mobile device. Use the Single Sign-On option and your SIUE email and password.

- At the bottom of the screen, click the plus + icon.

- Click Record Content.

- Choose Video or Audio on the menu at the bottom. Click the reverse camera icon if necessary to switch to the camera to the front if you need yourself on camera. Click the Record button (red circle) when ready to record. If recording yourself, frame yourself in the frame. Make sure that you are well-lit and there are no distractions in the background.

- Record your media. Remember, you will have the option to edit once it is uploaded to YuJa. Click the circle icon to end the recording.
- Click Use to save or Retake to redo.
- Press the play button to review. Optionally, give the video a title to better identify it when you are in YuJa. When you are satisfied, click the Upload button to send your video to YuJa. If you do not have wifi available and want to upload later, you may do that. The media is stored in the YuJa app and may be uploaded at a later time.
Upload an Existing Video with the YuJa Video App
- Click the YuJa Video icon on your mobile device. Use the Single Sign-On option and your SIUE email and password.

- At the bottom of the screen, click the plus + icon.

- Click Upload from Library or Upload From Files.
- Navigate to find the media you want to upload. Click the media you want to upload.
- Press the play button to review. Optionally, give the video a title to better identify it when you are in YuJa. When you are satisfied, click the Upload button to send your video to YuJa. If you do not have wifi available and want to upload later, you may do that. The media is stored in the YuJa app and may be uploaded at a later time.
Record Video with YuJa Browser Capture Tool (PC and Mac)
The YuJa Browser Capture tool uses many of the same features as the Software Capture tool, but does not require downloading and installing a file. A situation may arise when this is necessary; for example, using a Chromebook, classroom computers, or public computers where installing files is prohibited.
Chrome is the recommended browser for the Browser Capture tool.
- From the Media Library, click on the Create Recording button.

- A pop up window titled Create Recording will appear. In it click Browser Capture.

- Click the Launch Application button.
- A new browser window will open with the Browser Capture Studio. On the left are your Browser Capture Options. On the bottom of the new window are the Browser Capture Studio options.

- Recording Options:
Microphone: The available microphones will appear in the expandable menu.
Camera: Display only the default web cam in the record window. To change from one web cam to another, click expand the menu.
Present: A secondary window will appear listing the open tabs and windows available to share during the recording. An option to share your entire screen is available too. You have the option to share audio with tabs only.
PIP: PIP stands for Picture-In-Picture and A window will pop up allowing you to minimize or maximize either the window or tab you are sharing or your camera feed. Select the Window or Screen from the drop down menu
Click the Start Recording button when all options are set. - Record the video. Once the video is complete, click the Stop Recording button.
- Once you have finished recording, a new window will pop up with the status of your video's upload to YuJa. Click the Watch Video button to preview your video. Click the New Recording to record another video. Click Go to My Media to visit your media collection on SIUE's YuJa instance.
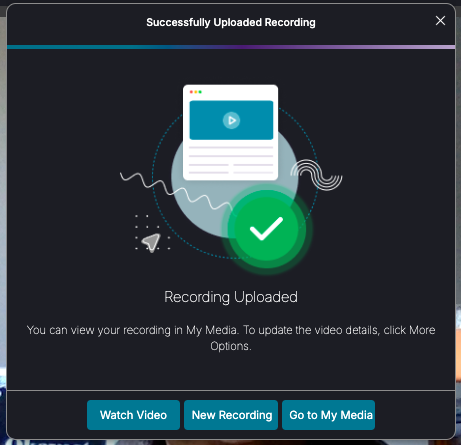
- When the upload is complete, you can return to the YuJa Media Library to edit your video.
Upload Your Video To YuJa
If you used the YuJa software capture tool or the YuJa browser capture tool, your video will be uploaded after the recording. If you recorded your video using different software, follow these directions to upload the video to YuJa.
Upload Media to YuJa
The following knowledge base article will use the term media rather than video. Although you have the ability to upload documents in YuJa, we strongly recommend that you continue to use OneDrive for large PowerPoint files, Word documents, and PDF files. YuJa's storage space is limited and more suited for storing videos and audio files.
Upload Media
- If you haven't already, create folders to keep your media organized. See the Knowledge Base Article "Create a Folder" for more information.
- Navigate to the folder in which you will upload your media. Double click on that folder.
- Drag and drop your media directly into the window or click the Upload button.
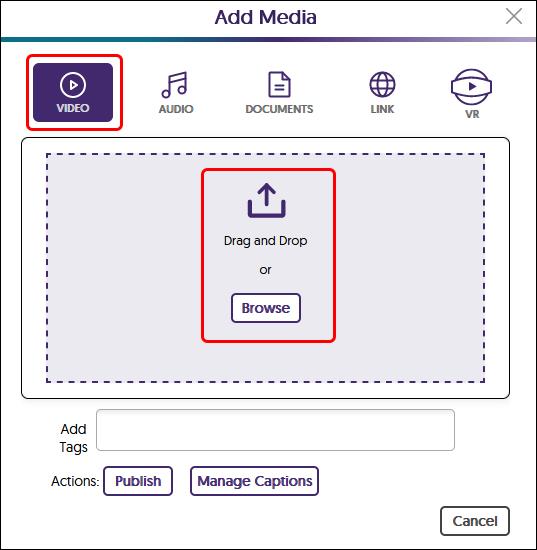
- If you are uploading video, make sure the "Video" icon is selected. If you are uploading audio, make sure the "Audio" icon is selected. Again, do not upload documents to YuJa. OneDrive is a better storage solution for documents. Drag and drop your media into the box or click the upload button. Navigate to your media file and upload it.
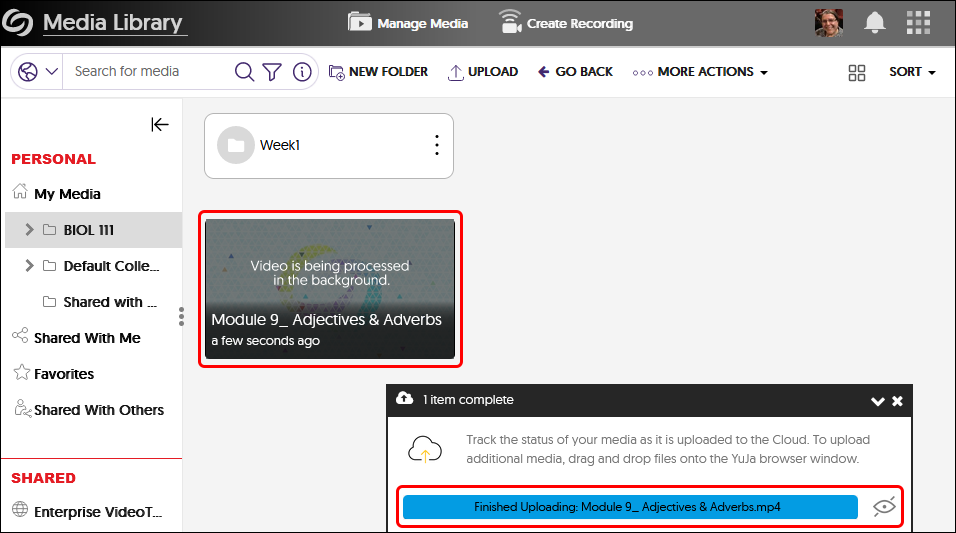
- Please wait until the status window at the bottom of the page states Finished Uploading. This upload process may take some time depending upon the size of your media. Once the upload is finished, you will see a thumbnail of the media processing. Do not do anything to that media until it is finished processing. You may upload more media or do other actions while that video is processing.
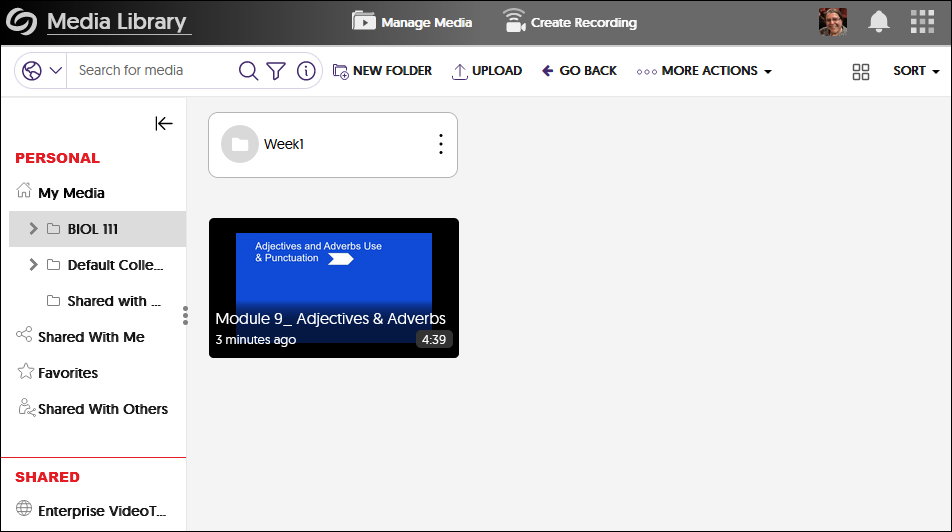
- Once the media is processed, you will see a thumbnail image, the length of media ("4:39" in image below), and length of time since upload ("3 minutes ago" in the image below).
Once the media is uploaded, you may continue editing, linking, sharing, etc.
Copy the Link to Your Video
Share a Video Link
YuJa provides a URL (direct link) for each video.
- Navigate to your video thumbnail. Hover your mouse over the thumbnail and click More in the menu.
- Click on Links from the left menu.
- Under the heading "Enable Auto Single-Sign-On for Embedded and Direct Linked Media" toggle to Enabled. This will allow students to view these videos within Blackboard. Click the Save Links button, but do not close the window.
Click on the Copy icon next to the Direct Link. This will copy the URL to your clipboard on your computer.
- Paste the link in an email, Blackboard discussion post, or other text area. If pasting in a text area in Blackboard, see the instructions for how to hyperlink text to make it easier for others to access your video.
Link Your Video in Blackboard
Whether you are attaching this link as a Blackboard assignment, Blog, Wiki, or Discussion Board, follow these instructions.
Hyperlink Text in the Text Editor
- Highlight the text you want to hyperlink.
- Click the Insert/Edit Link button (it looks like a chain link).
.png)
- A new window will appear. In the “Url” box, paste in your copied link.
- In the Title line, type the help text for the link.
- Choose the New Window option from the “Open link in...” menu.
- Click the Save button at the bottom of the window.
.png)
- Click Submit to share your work
.png)
Hyperlink an Email Address
- Highlight the text you want to hyperlink.
- Click the Insert/Edit Link button (it looks like a chain link).
- A new window will appear. In the “Url” box, type mailto: and the email address in which you want the email to send. (Note: Do not add any spaces here.)

- In the Title line, type the help text for the link.
- Choose the New Window option from the “Open link in...” menu.
- Click the Save button at the bottom of the window.


