YuJa (All Users) - YuJa Workflow
Step 1
Log Into YuJa
- From any Browser window (Firefox, Chrome, Safari, Edge), go to https://siue.yuja.com/.
OR
From within Blackboard, on the Institutional tab, in the Technology and Systems box, click on YuJa.
Note, when YuJa opens, these videos are University public-facing videos. You must sign in to access your Media Library.
- In the upper right corner of the YuJa landing page, confirm that the "Login Using" drop-down states Southern Illinois University Edwardsville Single-Sign-On. If it does not, click the drop-down menu and select that option.
Click the Login button. Login with your SIUE username and password.
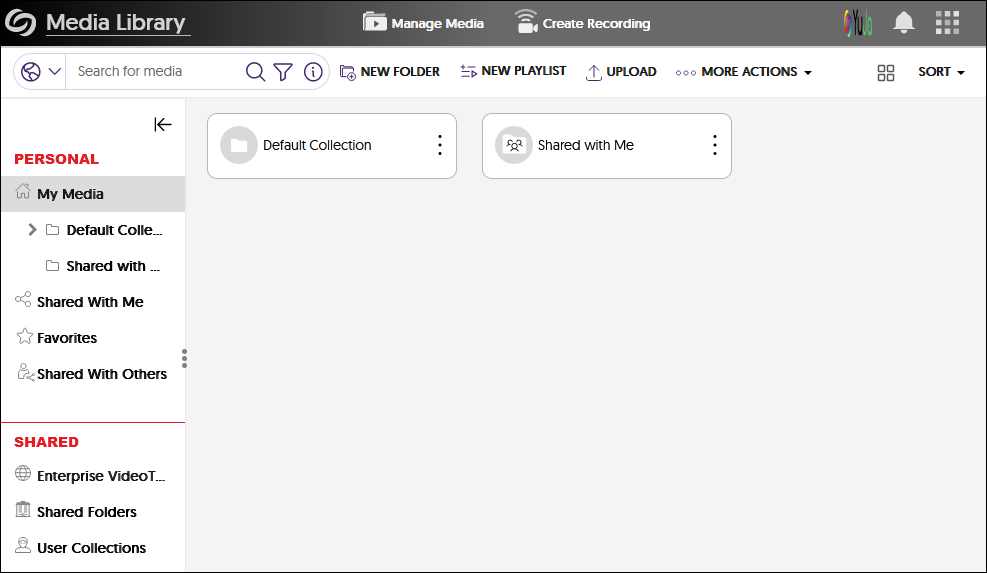
- Your Media Library page will open.
Step 2
Record a Video with YuJa Software Capture Tool (PC)
- Log into YuJa at https://siue.yuja.com/.
- Click on Create Recording at the top of the page.
- Select Software Capture, then click Launch Application.


- If you need to download the software, select download and follow the steps below:
Then click Open YuJa Software Capture button. - Now you will see the Yuja Software icon on your desktop

Software Capture Settings
- The YuJa Software Capture window opens.
- YuJa will notifiy you if updates are needed.
Follow these instructions for more details: Updating to the Latest Version of the YuJa Software Capture for PC Application.
Menu

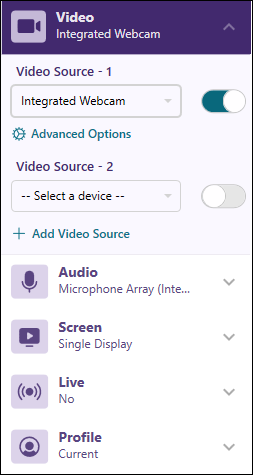
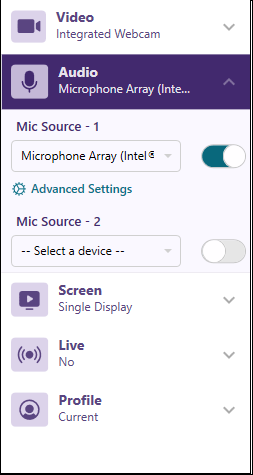
2. Audio: inputs microphone
3. Screen: software on your computer, such as PowerPoint
4. Live stream: we currently do not subscribe to this option
5. Profile: you can change your settings and save as a Profile.
Main Window
Menu Options
Video
Click on the drop-down arrow next to Video. The first video source will default to your integrated webcam within your device. That may be changed to an external webcam or other video camera within your system. The Video Source 2 must be toggled on to work. This could be an additional front facing webcam to capture the classroom or another video source within your system. If you need assistance setting this up, please contact the ITS Help Desk at 650-5500.
Audio
Screen
The Screen source is your primary computer screen display. If you have more than one monitor, click on Advance Settings and select Duo Displays. If you need assistance setting this up, please contact the ITS Help Desk at 650-5500.
Profile

Record
- Once you have your video, audio, and screen settings saved, click the Start button. Remember, you will be able edit the video when you have finished, so don't worry about extra video at the beginning or end.

YuJa will provide you with a 3 second countdown. Don't worry if you don't start right away. You can later trim off any extra video at the beginning or end. - A small toolbar will appear on your screen. Click the "pause" button if you wish to pause the recording. When you click the pause button again, you will continue with the recording.
Click the "Stop" icon when you are finished recording. - Click the "Save" button to begin the upload of your video to YuJa.
- A status bar will appear on your screen. When the status reads 100%, return to YuJa for post-production editing/captioning/linking.
Record a Video with YuJa Software Capture Tool (Mac)
- Log into YuJa at https://siue.yuja.com/.
- Click on Create Recording at the top of the page.

Software Capture Settings

Menu

2. Audio: inputs microphone
3. Screen: software on your computer, such as PowerPoint
4. Live stream: we currently do not subscribe to this option
5. Profile: you can change your settings and save as a Profile.
Main Window

Menu Options
Video
Click on the drop-down arrow next to Video. The first video source will default to your integrated webcam within your device. That may be changed to an external webcam or other video camera within your system. The Video Source 2 must be toggled on to work. This could be an additional front-facing webcam to capture the classroom or another video source within your system. If you need assistance setting this up, please contact the ITS Help Desk at 650-5500.
Audio


Screen
The Screen source is your primary computer screen display. If you have more than one monitor, click on Advanced Settings and select Duo Displays. If you need assistance setting this up, please contact the ITS Help Desk at 650-5500.
Profile

Record
1. Once you have your video, audio, and screen settings saved, click the Start button. Remember, you will be able to edit the video when you have finished, so don't worry about extra video at the beginning or end.
YuJa will provide you with a 3-second countdown. Don't worry if you don't start right away. You can later trim off any extra video at the beginning or end.
2. A small toolbar will appear on your screen. Click the "pause" button if you wish to pause the recording. When you click the pause button again, you will continue with the recording.
Click the "Finish" icon when you are finished recording.

3. Click the "Save" button to begin the upload of your video to YuJa.


Record Media via the Mobile App
Record New Media (Video or Audio) with the YuJa App
- Click the YuJa Video icon on your mobile device. Use the Single Sign-On option and your SIUE email and password.

- At the bottom of the screen, click the plus + icon.

- Click Record Content.

- Choose Video or Audio on the menu at the bottom. Click the reverse camera icon if necessary to switch to the camera to the front if you need yourself on camera. Click the Record button (red circle) when ready to record. If recording yourself, frame yourself in the frame. Make sure that you are well-lit and there are no distractions in the background.

- Record your media. Remember, you will have the option to edit once it is uploaded to YuJa. Click the circle icon to end the recording.
- Click Use to save or Retake to redo.
- Press the play button to review. Optionally, give the video a title to better identify it when you are in YuJa. When you are satisfied, click the Upload button to send your video to YuJa. If you do not have wifi available and want to upload later, you may do that. The media is stored in the YuJa app and may be uploaded at a later time.
Upload an Existing Video with the YuJa Video App
- Click the YuJa Video icon on your mobile device. Use the Single Sign-On option and your SIUE email and password.

- At the bottom of the screen, click the plus + icon.

- Click Upload from Library or Upload From Files.
- Navigate to find the media you want to upload. Click the media you want to upload.
- Press the play button to review. Optionally, give the video a title to better identify it when you are in YuJa. When you are satisfied, click the Upload button to send your video to YuJa. If you do not have wifi available and want to upload later, you may do that. The media is stored in the YuJa app and may be uploaded at a later time.
Step 3
Upload Media to YuJa
Upload Media
- If you haven't already, create folders to keep your media organized. See the Knowledge Base Article "Create a Folder" for more information.
- Navigate to the folder in which you will upload your media. Double click on that folder.
- Drag and drop your media directly into the window or click the Upload button.
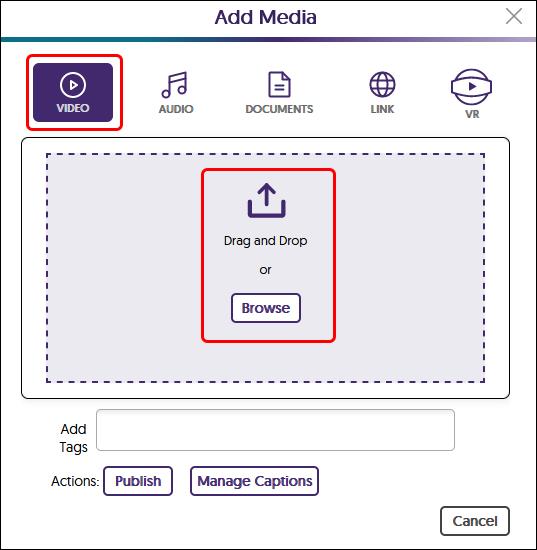
- If you are uploading video, make sure the "Video" icon is selected. If you are uploading audio, make sure the "Audio" icon is selected. Again, do not upload documents to YuJa. OneDrive is a better storage solution for documents. Drag and drop your media into the box or click the upload button. Navigate to your media file and upload it.
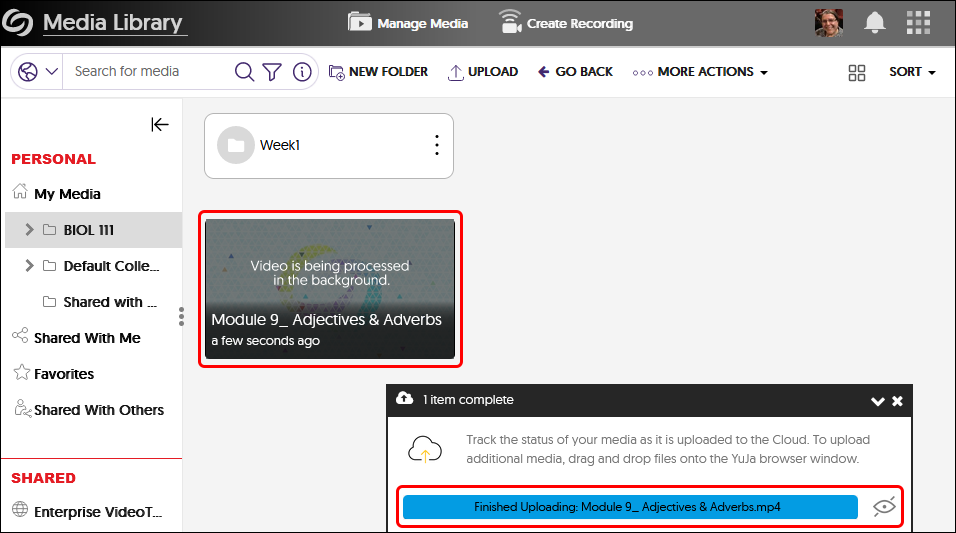
- Please wait until the status window at the bottom of the page states Finished Uploading. This upload process may take some time depending upon the size of your media. Once the upload is finished, you will see a thumbnail of the media processing. Do not do anything to that media until it is finished processing. You may upload more media or do other actions while that video is processing.
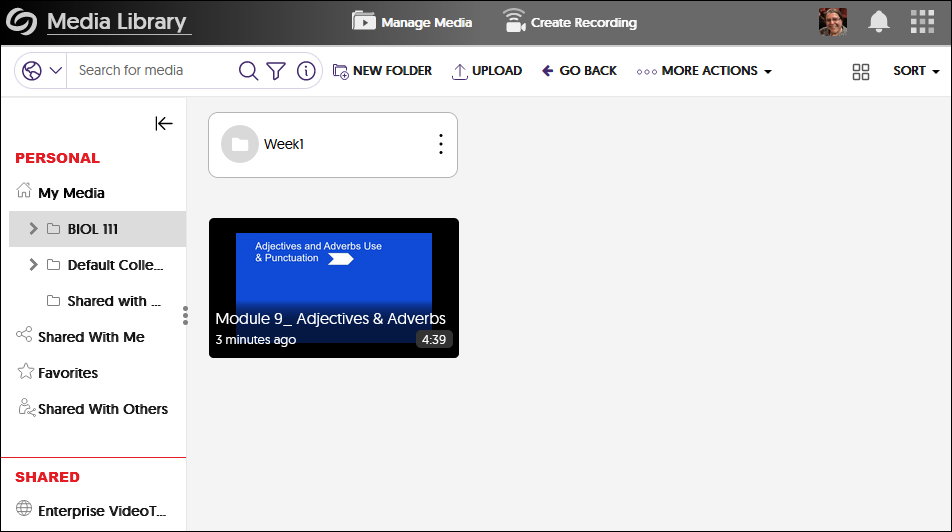
- Once the media is processed, you will see a thumbnail image, the length of media ("4:39" in image below), and length of time since upload ("3 minutes ago" in the image below).
Once the media is uploaded, you may continue editing, linking, sharing, etc.
Step 4
Edit Captions
Benefits of Captioning
- Users are able to view the spelling of discipline specific terminology.
- Increased comprehension and improves performance.
- ESL students benefit when reading comprehension is better than auditory comprehension.
- Users in a quiet environment when they can not listen to the audio without headphones. (e.g. Library).
- Users viewing the video in a loud environment (such as the cafeteria) can benefit when they cannot use headphones.
Generating Captions
- Manually Editing Captions
- Find and Replace Words
- Captioning Confidence Score
- Download the Captions
- Upload Captions
Editing Captions
Manually Editing Captions
-
Navigate to the video. Hover your mouse over the thumbnail and click Edit.
- Click on the CC icon in the video editing toolbar.

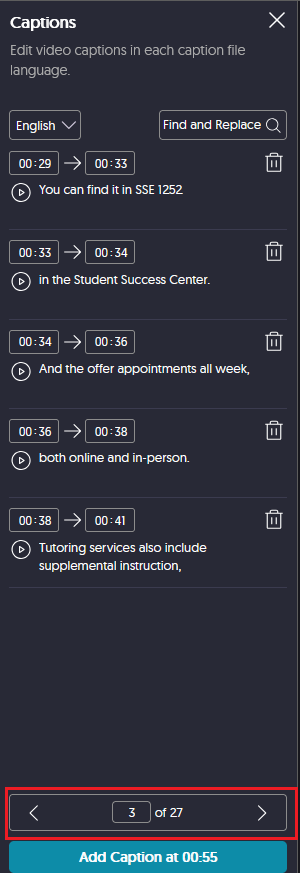
- Read through the captions in the Caption window. Use the forward and back arrows to display the captions.
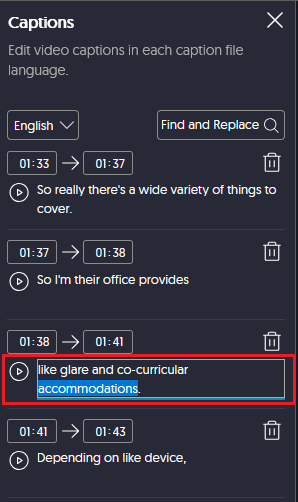
- Type directly into the caption box to correct a word...
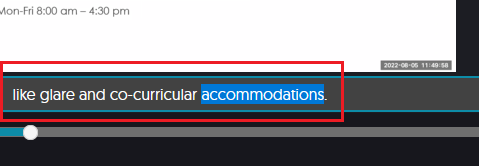
...or type into the closed caption in the black box under the video to correct the word. - Continue editing the captions. When you are finished, click the Save button at the top of the page.
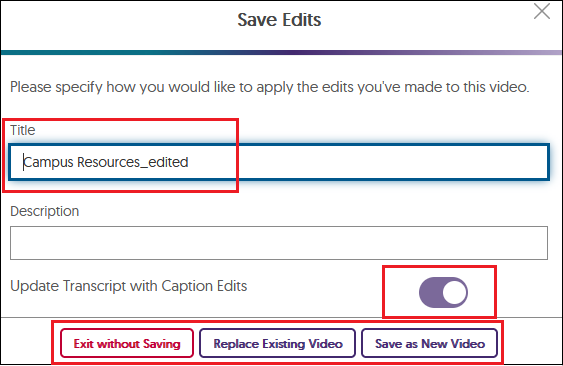
- You may change the title of the video here. Note that "edited" will appear after the tile. You may keep that or delete that.
- Click on "Replace Existing Video" if you are satisfied with the edit and wish the edits to become permanent in the existing version of the video.
- Click on "Save as New Video" if you wish to keep the original copy intact. This option is recommended if you are new to editing and may wish to keep a copy of the original for safe keeping.
- Click "Exit without Saving" if you wish to discard the edits.
Find and Replace Words
- Navigate to the video. Hover your mouse over the thumbnail and click Edit.
- Once the Video Editor launches, if the Advanced Mode is off, click the Advanced Mode toggle to switch it on.
- Click on the CC icon in the video editing toolbar.
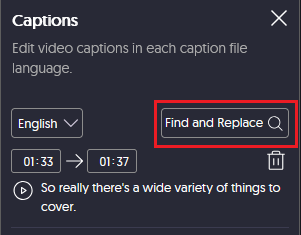
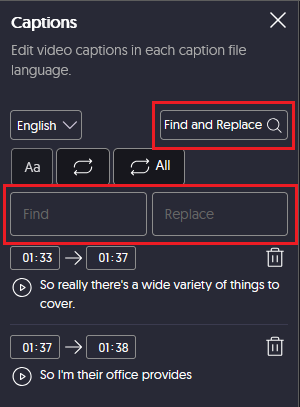
- In the Captions window, click on the Find and Replace button (with magnifying glass) in the upper right corner.
- In the Find box, type in the word as it is spelled in the captions.
In the Replace box, type in the word as you wish it to be spelled.
Click the Replace button (circle arrows) or the Replace ALL button (circle arrows ALL).
The word(s) will be replaced. - Continue editing the captions. When you are finished, click the Save button at the top of the page.
- You may change the title of the video here. Note that "edited" will appear after the tile. You may keep that or delete that.
Confirm that "Update Index and Transcript with Caption Edits" is toggled to Yes.
- Click on "Replace Existing Video" if you are satisfied with the edit.
- Click on "Save as New Video" if you wish to keep the original copy intact. This option is recommended if you are new to editing an may wish to keep a copy of the original for safe keeping.
- Click "Exit without Saving" if you wish to discard the edits.
Caption Confidence Score
- Navigate to the video. Hover your mouse over the thumbnail and click Edit.
- Once the Video Editor launches, if the Advanced Mode is off, click the Advanced Mode toggle to switch it on.
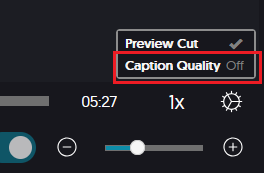
- Click on the Settings cog icon in the menu toolbar.
- Click to turn on Caption Quality and select quality option.
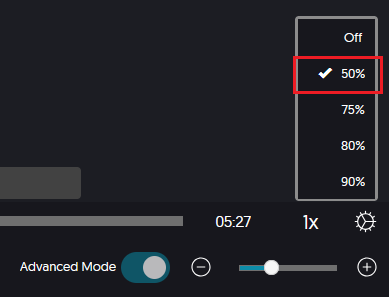
- Select the caption quality option 50%, 75%, 80%, and 90%. The higher the number, the more chance that the words will get flagged.
- For example, if you set the caption quality option to 80%, any words that the AI tracks as being below the 80% confidence threshold will highlight in blue.
- Continue editing either manually or with "find and replace." When you are finished, click the Save button at the top of the page.
- You may change the title of the video here. Note that "edited" will appear after the tile. You may keep that or delete that.
Confirm that "Update Index and Transcript with Caption Edits" is toggled to Yes.
- Click on "Replace Existing Video" if you are satisfied with the edit.
- Click on "Save as New Video" if you wish to keep the original copy intact. This option is recommended if you are new to editing an may wish to keep a copy of the original for safe keeping.
- Click "Exit without Saving" if you wish to discard the edits.
Download Captions
- Hover your mouse over the thumbnail and click on More in the menu.
- Click on the Accessibility link in the menu.
- Next to English - SRT Caption File, click the Download button. The .srt file will download to your computer. Open the file in Notepad.
You can also download a copy of the transcript in plain text (.txt) or a PDF file. This is just the text of the captions, no associated time code.
Upload Captions to YuJa
- Hover your mouse over the thumbnail and click on More in the menu to open up the Media Details panel.
- Click on the Accessibility link in the menu.
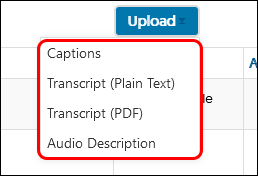
- When the window opens, click on Upload then select Caption.
- Select the type of caption. More times than not, you will select Captions from the menu. Choose the appropriate language from the dropdown box and upload. Click Yes to overwrite any old captions and to complete the upload process.
- Once the captions are uploaded, you will return to the Accessibility window.
*NOTE: if SRT, XML and WebVTT caption files are formatted to include bold, italic or underlined words or phrases, the Media Player will display the caption accordingly.
Trim a Video
- To edit a video, navigate to the thumbnail of that video. Hover your mouse over the thumbnail and click Edit from the menu.

- The Video Editor will open:

The tools that you will need to use are:
- Video Thumbnail - this is the playback version of your video. You should rely on this video display when you are editing rather than the smaller thumbnails in the Primary section in the timeline.
- Play button - click the play button to play the video. Click the pause button (2 vertical lines) to pause the video.
- Edit Mode - Click the scissors icon to enter the edit mode.
- Zoom Controller - controls the length of the timeline you see on the screen. You may need to zoom into your timeline (+ button) if your video is longer than a minute or two.
- Time Code Bar - this bar shows the time in minutes:seconds:fraction of seconds. This is the exact spot where the edit will begin or end. - Play your video to where you want the edit to end. In this example, everything to the left of the Time Code Bar will be deleted. Everything to the right of the bar will be the beginning of the video.

- Click on Edit button (scissors icon). Hover your mouse over the Time Code bar and drag your mouse to the beginning of the video. Note a gray shading will appear over the area you wish to edit out of the video. Click your mouse button at the beginning of the video.

If this is not the edit you wish, hover your mouse over the gray section and click the X in the gray box. - Repeat the process if you wish to trim off the end of the video. But in this case, jump to near the end of the video. Play the video to where you want the video to end.
Click the Edit button.
Drag your mouse from the Time Code Bar to the end of the original video.
- Click the Save button at the top of the window above the video thumbnail.

- You may change the title of the video here. Note that "_edited" will appear after the tile. You may keep that or delete that.
Confirm that "Update Transcript with Caption Edits" is toggled to on, to the right.
- Click on "Replace Existing Video" if you are satisfied with the edit.
- Click on "Save as New Video" if you wish to keep the original copy intact. This option is recommended if you are new to editing and may wish to keep a copy of the original for safekeeping.
- Click "Exit without Saving" if you wish to discard the edits.
- You will be returned to your Media Library. If you have other edits or to view the video, navigate back to your video.
Step 5
Add a Web Link and Embed in Blackboard

- Navigate to your video thumbnail. Hover your mouse over the thumbnail and click More in the menu.
- Click on Links from the left menu.
- Under the heading "Enable Auto Single-Sign-On for Embedded and Direct Linked Media" select the Enable radio button. This will allow students to view these videos within Blackboard. Click the Save Links button, but do not close the window.
Click on the Copy icon next to the Embed Code. This will copy the code to your clipboard on your computer.
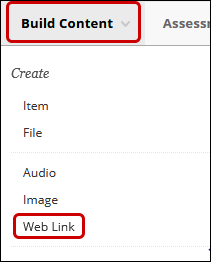
Do not close this window. - Return to Blackboard in a new tab or window. Do not close the YuJa window. Navigate to the Content Area/Folder where you want to link the video. Hover your mouse over the Build Content button. Click on Web Link from the menu.
- Title the video. In the text box, click on the source code icon < >. Continue with the rest of the settings.
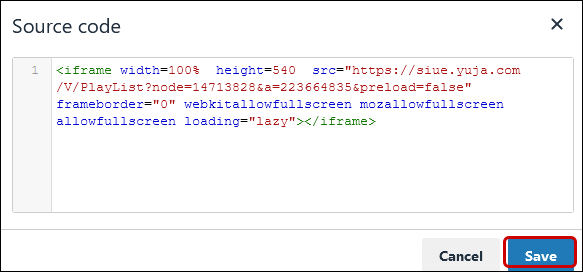
Note: The rows of icons are fluid based upon the size of your browser window. The source code icon may appear in the second row or third row. - The Source Code window opens. Click on the first line. While holding down the Ctrl key on your keyboard, type v. This will paste your code in the box. Click the Save button at the bottom of the window.
- If you want to make the video player window larger, click and hold the blue box in the lower right corner and drag the box to the size you want. Click Submit at the bottom of the page.

- Return to YuJa. Confirm that the "Enable Auto Single-Sign-On for Embedded and Direct Linked Media" Enable radio button is still connected.Copy the Direct Link by clicking on the Copy icon.

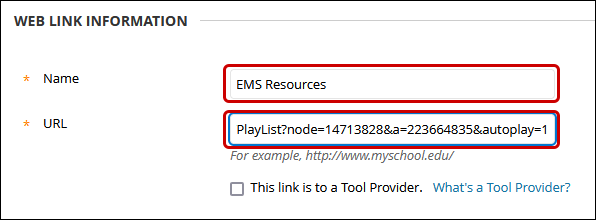
- Return to Blackboard. Paste the Direct Link into the URL box.
- Click Submit at the bottom of the page.
- Students now have the embedded video to view, and the direct link to the video.

Link a YuJa Folder in Blackboard
There are two ways to link to a YuJa folder:
- Web Link
- Embed

Embedded videos take up more space but give the student a quick glance at the videos to watch.

Creating a Web Link in Blackboard
- In YuJa, navigate to the folder.
- Hover your mouse over the folder.
- Click on the cog icon.
- Click on More in the menu.

- From the left menu, click on Links.
- To create a link in Blackboard, click on the Copy icon next to the Direct Link.

- Return to Blackboard. Navigate to the Content Area or folder to which you wish the folder link to reside.
- From the menu, click on the Build Content button. Then from the menu, click on Web Link.
- Give a name that describes the videos. Click your mouse in the URL box. Hold the CTRL key down while typing the letter v. This will paste the Direct Link URL into the box.
- Complete the remaining setting as needed. Click Submit at the bottom of the page.
Create an Embedded Box of Video Thumbnails in Blackboard
- In YuJa, navigate to the folder.
- Hover your mouse over the folder.
- Click on the cog icon.
- Click on More in the menu.

- From the left menu, click on Links.
- Click on the Copy button for the Embed Code.

- Return to Blackboard. Navigate to the Content Area or folder to which you wish the folder link to reside.
- From the menu, click on the Build Content button. Then from the menu, click on Item.
- Name the link. Then click on the source code button. It looks like less than/greater than symbols. < >. Note, the number of rows of icons will be different depending upon how large your browser window is set at.
- When the Source code window opens, click your mouse on the first line. Then hold the Ctrl key down while typing the letter v.
Click Save at the bottom of the window. - Complete the remaining settings as needed. Click Submit at the bottom of the page.


