Blackboard (Faculty) - Groups: Create Group Assignments
This document provides an overview of Group Assignment option in Blackboard's Assignment Tool.
Blackboard's Assignment can be set up to accept group submissions. With group submissions, only one member of the group submits the assignment on behalf of all of the members. Faculty then grade the one submission and the grade is distributed to all members of the group. Instructors have the option to change any individual member's grade if necessary.
Create a Group
Groups allow smaller numbers of students to collaborate on course work. Only members of the group and the faculty can see the group.
Group Types
There are two types of group creation options:
- Single Group - create one group at a time.
- Group Set - create multiple groups with same settings and titles (which can be changed later).
Group Enrollment
There are three types of Group Enrollment to choose from:
- Manual Enroll - allows you to assign each student to a group
- Random Enroll - automatically distributes students based on number of students in each group or based on number of groups. This is only available in group sets.
- Self-Enroll - allows the student to select the group for themselves.
Create a Single Group
- From the Control Panel, click on Users and Groups, then click Groups.
- Click Create, then under "Single Group," select Self-Enroll or Manual Enroll.
- Type in a group name and optional description.
- Make sure the group is visible to students. Select Yes. Students will see their assigned group and tools below the left navigation.
- Select the tools that you wish for your students to access.
- Enrollment Choices
- Self-enroll:
- "Sign-up Options" - Type in a name for the sign-up sheet and provide instructions.
- "Maximum Number of Members" - Type in the maximum number of students that you wish to sign up for this group. Once the maximum number of students have signed up, the group will no longer accept additional members. Students must then select a different group. This option prevents group membership from being unbalanced.
- "Create smart view for this group" - Check this box if you wish a smart view to be added to the Grade Center for this group.
NOTE: Students cannot unenroll themselves from "self-enroll" groups. Instructors in the course must make that adjustment.
OR
- Manual-enroll:
- "Create smart view for this group" - Check this box if you wish a smart view to be added to the Grade Center for this group.
- "Membership" - Click the Add Users button. Check the box to the left of each student's name to be added to this group. Click the Submit button when you have selected all the students.
- Self-enroll:
- Click Submit at the bottom of the page.
Create a Group Set
- From the Control Panel, click on Users and Groups, then click Groups.
- Click Create, then under "Group Set," select Random Enroll, Self-Enroll, or Manual Enroll.
- Type in a group name and optional description. This group name will be copied to all the groups with a number. For example, if you select the name "Team" the groups will be named "Team 1," "Team 2," etc. Note: The Group Set name cannot be edited once you click submit on the Create Group Set page. The group set description and individual group names can be edited.
- Make sure the group is visible to students. Select Yes. Students will see their assigned group and tools below the left navigation.
- Select the tools that you wish for your students to access.
- Enrollment Options
- Random enroll:
- "Membership" - Determine the number of groups by the number of students per group or by the number of groups.
For example, if you have 5 topics you would select "Number of groups" = 5. A course with 20 students would have 4 students in each group. If you have one topic and you want no more than 3 students in a group, "Number of Students per Group" would be 3. A course with 20 students would have 7 groups (6 groups with 3 and one group with 2).
Determine how to enroll any remaining members: Select the option for remaining members.
- "Membership" - Determine the number of groups by the number of students per group or by the number of groups.
- Self-enroll:
- "Sign-up Options" - Type in a name for the sign-up sheet and provide instructions.
"Maximum Number of Members" - Type in the maximum number of students that you wish to sign up for this group. Once the maximum number of students has signed up, the group will no longer accept additional members. Students must then select a different group. This option prevents group membership from being unbalanced.
"Number of Groups" - designate how many groups will be created.
"Create smart view for this group" - Check this box if you wish a smart view to be added to the Grade Center for this group.
NOTE: Students cannot unenroll themselves from "self-enroll" groups. Instructors in the course must make that adjustment.
- "Sign-up Options" - Type in a name for the sign-up sheet and provide instructions.
- Manual-enroll:
- "Number of Groups" - designate how many groups will be created.
"Create smart view for this group" - Check this box if you wish a smart view to be added to the Grade Center for this group.
You will be able to assign students on the next screen after clicking Submit at the bottom of the page.
- "Number of Groups" - designate how many groups will be created.
- Random enroll:
- Click Submit at the bottom of the page.
How to Identify Individual Groups from Group Sets

Create a Blackboard Assignment
- Navigate to the course area or folder where you want to create the assignment.
- From the menu, click/hover over Assessments, then click Assignment.

- Type a name and instructions.
Optionally, attach a file:
In the Assignment Files section, attach a file using the Browse Local Files, Browse Content Collection, or Browse Cloud Service buttons. - On the Due Dates section, enter a date and time that assignment will be due. This will trigger notifications in the Calendar and Global Navigation area. This does not set a release date.
- In the Grading Section, enter the point value for the assignment. This is a numeric number, not a percentage.
Optionally, attach rubric:
Attach a rubric for this assignment. See Create A Rubric for more information. - Click on the Submission Details link. Determine the Assignment type: Individual Submission, Group Submission, or Portfolio Submission.
In the Number of Attempts, select Single Attempt, Multiple Attempts (enter number of attempts allowed in the box) or Unlimited Attempts.
Optionally, set grading options:
Click on the Grading Options link. Select Enable Anonymous Grading if students names are to be hidden, or Enable Delegated Grading, if more than one grader is used.
Optionally, set how grades are displayed in the Grade Center.
Click the Display of Grades link. Select how you want the Primary and Secondary grades to be displayed in the Grade Center.
These settings can also be set and changed from the Grade Center column. - In the Availability Section, set the Display After and Display Until dates and times. This is the dates and times the assignment link is visible to your students.
- Click Submit at the bottom of the page.
Designate a Group Assignment
- Follow the steps above to create Groups in Blackboard and to create an Assignment.
- In the "Grading" section of the assignment, click on the Submission Details link.
- Click the Group Submission radio button.
- Two boxes will appear under the Group Submission selection: an "Items to Select" box on the left and "Selected Items" on the right. In the left box, you will see all available groups in your course (if you do not see groups here, you will need to create them). The right box will be blank at first.
- From the left-hand "Items to Select" box, click on the name of the group that should be submitting the assignment, or click the Select All to select every group listed.
- With the appropriate group(s) selected/highlighted, click the right-pointing arrow in between the two boxes. This will move the groups from the left-hand "Items to Select" box to the right-hand "Selected Items" box.
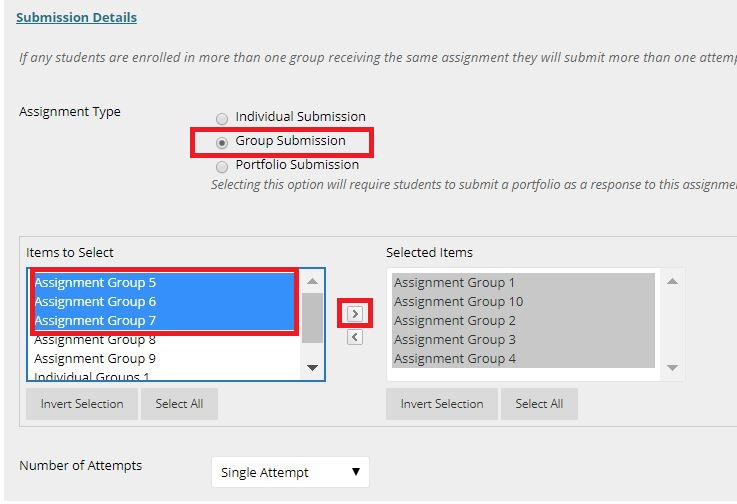
- Click Submit at the bottom of the screen to save your changes.
See Also
- Blackboard (Faculty) - Groups: About Groups
- Blackboard (Faculty) - Groups: Grade a Group Assignment
- Blackboard (Faculty) - Groups: Create a Group
- Blackboard (Faculty) - Groups: Edit Group Settings
- Blackboard (Faculty) - Groups: Add or Remove Students from a Group
- Blackboard (Faculty) - Groups: Grade a Group Discussion Board