Blackboard (Faculty) - Messages: Send a Message
This document provides an overview of sending a Blackboard message.
- Log into your Blackboard course.
- In order for your student to receive Course Messages, they must access the tool either through the "Tools" link or you can add a link to the Course Messages tool to the Course Menu or other content area (e.g. About this Course).
Click the
below to expand the menus for directions.
- Create Messages link in the Course Menu
-
- Click on the small plus sign (+) in the top-left corner of your course menu.
- Select the type of item you want to add. These are the most commonly used menu items:
- Content Area: a blank area used to organize course materials and assessments, such as weekly folders, files, quizzes, and discussion links.
- Tool Link: a link to one of Blackboard's tools, such as the Discussion Board, My Grades, or Groups.
- Web Link: a link to an external website, such as YuJa or YouTube video or Office 365 file.
- Course Link: a link to a file stored elsewhere in your course, such as a syllabus.
- New menu items will appear at the bottom of the course menu. Drag and drop the link in the location you would like it to appear on your course menu. If you cannot drag and drop, see this workaround for manually reordering menu items.
Delete Content Areas and Tools to the Course Menu
- Hover your mouse over the name of the content area or tool you want to delete.
- Click on the circular grey icon to the right of the name.
- Choose Delete from the drop-down menu.
- A pop-up box will appear asking you if you are sure. Click Delete the menu item to delete the link. Click Hide the Link if you wish to make it unavailable to students. Click Cancel to return to the course menu.
IMPORTANT: Once a Content Area or Blank Page is deleted, it can not be retrieved. If a link to a Tool is deleted (such as My Grades, or Discussion Board), the tool can be added back to the course menu.
NOTE: If you are deleting a content area with assessments, such as Tests, Assignments or Turnitin Assignments, you should delete the assessment itself before deleting the entire content area. Deleting the assessment first will remove the associated column in the Grade Center; Deleting the entire content area (for example, the folder where the assessment is stored) instead of deleting the assessment itself leaves an associated column in your Grade Center that cannot be deleted.
The "Default" Course Menu
The Course Menu you see in a new Blackboard shell includes the most-used tools and content areas, which are described below. Click the
below to expand the menus for directions. You can modify this menu as you see fit.
- Default Course Menu
-
In conversations with the Continuity Task Force of the Faculty Senate, ITS-Instructional Design & Learning Technologies (IDLT) were asked to revise the default Blackboard course menu in order to facilitate best practices in online teaching. IDLT understands that every class has different needs, so the following instructions walk you through how to customize your course menu for your specific needs.
Default Course Menu
The default Course Menu has been designed with the most commonly used tools and content areas.
NOTE: The grey square indicates that there is nothing in the content area (About this Course and Coursework). Students will not see this link until you add content. Once you add content, the grey square will disappear.The grey square with a line through indicates that this tool is hidden from the students (RedShelf, Zoom Meetings, Teaching Toolkit). If you wish to show the RedShelf and Zoom Meetings links to students, see the Make Link Available section of this article. The Teaching Toolkit is meant to a resource for faculty and should stay hidden from students.
Course InformationAnnouncements: Use announcements frequently to remind students about upcoming due dates, give an update for the week, or to summarize feedback on a given assignment.About This Course: Place items such as the syllabus, contact information, textbook information, etc. in this content area. Note the gray square icon behind the link. This indicates that there is no content in this area when the course shell is initially created.Course Content
Coursework: Create weekly or module folders that contain the readings, assignments, or other information needed for that week/module. Remember the rule of 3: No more than 3 clicks to get to an item. Note the gray square icon behind the link. This indicates that there is no content in this area when the course shell is initially created.Discussion Board: A link to the course discussion board. Create an open forum for questions. Subscribe to the forum to receive email alerts when someone has posted here.Redshelf: If you are using a textbook through Redshelf, you will want to unhide this link. Note the gray box with a line through it next to Redshelf. That indicates that that link is not visible to the students. Click the drop-down arrow and choose Show Link. Visit this KnowledgeBase article for additional instructions on the Redshelf link.Course Tools
The Course Tools section will hold other tools that the student may use throughout the semester. You may wish to add other tools such as Journals or Groups to this section.My Grades: Students need this tool to be able to view their grades.Email: This tool is handy for emailing your students and also allows for ease of students communicating with you or other students.Zoom Meetings: Link to the Zoom Sessions tool in Blackboard. This allows you to schedule Zoom meetings for office hours and synchronous lectures. Note the gray box with a line through it next to Zoom Meetings. That indicates that that link is not visible to the students. Click the drop-down arrow and choose Show Link.Other Resources
ITS Help/Resources: This links to the ITS Help page which also lists additional student services.
Library Resources: The Library Resources page. Provides students and faculty access to research guides, Live Chat, the database A-Z list, group study room reservations, and one-on-one librarian appointment reservations.Teaching Toolkit: Links to the IDLT Teaching Toolkit. The link is hidden from the students but is available for you as a resources to help plan and revise courses, find suitable technology, remove learning barriers, and build high-quality learning environments.Online Tips-Faculty: This links to a checklist for engagement and communication in asynchronous learning for online courses.Online Tips-Student: This links to a checklist for student success in online courses.You may wish to add other resources to this section such as professional web pages or links to your department webpage.Customize Your Course Menu
Use the information below to add, hide, or remove links and tools to the default course menu.Add a Link to the Course Menu
To add any link, subheader or divider to the course menu, click on plus sign (+) at the top of the Course Menu.Select Content Area, Tool, Subheader, or Divider.Content Area
If you add a Content Area, name the content. Names under 25 characters work best.Check the box "Available to Users."Click the Submit button.The Content area will appear at the bottom of the Course Menu. See Move Link for instructions on how to move the link to another location in the Course Menu.Tool Link
If you select "Add Tool Link," name the link.Select the type of tool from the "Type" dropdown box.Check the box "Available to Users."Click the Submit button.The Content area will appear at the bottom of the Course Menu. See Move Link for instructions on how to move the link to another location in the Course Menu.Web Link
If you select "Add Web Link," name the link.It is best practice to open the webpage in another window and copy the URL from that window. Then return to Blackboard and paste the URL into the box.Check the box "Available to Users."Click the Submit button.The Content area will appear at the bottom of the Course Menu. See Move Link for instructions on how to move the link to another location in the Course Menu.Make a Link Available
If you wish for a student to see a link, click on the drop-down arrow next to the link.Select Show Link from the menu.Hide a Link
If you are unsure if you will need a link, or if you are not ready for students to see the content, hide the link.Hover your mouse over the link and click on the drop-down arrow.Select Hide Link from the menu.If you know that you will not be using a tool or Content area, delete it so that it does not clutter up the Course Menu and confuse your student.
NOTE: If you delete a tool link, such as Discussion Boards, you are deleting the link to the tool. You are not deleting the tool. You can always add the tool link back to the Course Menu or link to the tool from within a Content Area.If you delete a Content Area such as Coursework, you will delete all of the content and that is not reversible. You will have to rebuild the entire content area. If there are tests and assignments, the student's work will be lost. If you are not sure, best practice is to hide the Content Area, rather than delete it.To delete a link, hover your mouse over the link and click on the drop-down arrow.Select Delete from the menu.You will be warned about the deletion. If there is content in the Content Area, those links will be listed. If you are unsure, than click Hide the Link. If you are positive that you want to delete the link, click Delete content.Move a Link From the Course Menu
When links and Content Areas are created, they will appear at the bottom of the Course Menu. To move them, hover your mouse over the left side of the link.Click and hold your mouse button down over the double arrow.Drag the link to the desired place.Course Theme
Blackboard offers the ability to adjust the default Course Theme to change the color of the page background and/or color of the text in the course shell. However, altering the default course theme or background and text color could negatively impact the accessibility of the course shell content and impact students' ability to complete their coursework. As a result, ITS strongly recommends that faculty not alter the default Course Theme or use alternate colors for the background or text.A Note About Importing Your Previous Course Materials
If you import course material from a previous course, any materials in "About this Course" and "Coursework" will import into this shell's content area with the matching name. If you changed the name of Coursework to, for example, "Weekly Modules," a new Course Area by that name will be added to the bottom of the Course menu. You will need to delete the "Coursework" link and move the "Weekly Modules" link.If you import your course materials every semester, you may start to develop a row of dividers and "Help" links. Leaving the dividers and multiple "Help" links create an unnecessary long Course Menu as well as confuses the students. Students assume that there should be some content between the dividers and grow concerned when they can't see it.Hover your mouse over the divider and click the drop-down arrow.Select Delete from the menu. Repeat that to remove all extra dividers and Help links.
-
- Click on the small plus sign (+) in the top-left corner of your course menu.
-
- Create Messages link in the Course Menu
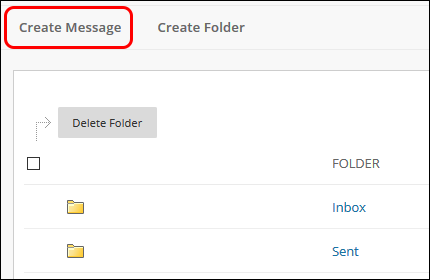
- Click on Create Message button in the tool bar.
- Click the To: button. Select the users by clicking on the name. To select more than one user, hold your Ctrl (PC) or Command (Mac) and click each name.
- Click the right arrow to send the names to the Recipients box.
- In the Compose Message section, enter text in the "Subject" box and in the "Body" box.
- Click the Submit button at the top or bottom of the page.