Blackboard (Students) - Self-Proctoring Online Exam Using YuJa
Prior to the Exam
- Schedule the exam with the instructor in advance or look to your syllabus or course for the scheduled days(s)/time(s).
- Your exam will be located in Blackboard.
- The exam may be set up with a variety of options (e.g. time limits, no-backtracking, auto-submit) per the instructor’s preferences.
- You are expected to follow all guidance in taking the exam provided by the instructor.
- If applicable, a password may be provided to you before the exam is open.
- Sign in to YuJa if you have never logged in before. Select SIUE Single-Sign-On in the top right corner of the page.
You need to ensure that YuJa is set up before the scheduled exam time and that you are comfortable with the steps outlined below.
During the Exam
Taking the exam follow this sequence of activities:
- Choose one of the methods below for capturing your video with YuJa. Start a new YuJa Capture Recording session.
Click the ![]() below to expand the menus for directions.
below to expand the menus for directions.
YuJa (All Users) - Recording Using the YuJa Software Capture Tool (PC)
- Log into YuJa at https://siue.yuja.com/.
- Click on Create Recording at the top of the page.

- Confirm the drop down menu is "Record from your Windows PC or Mac." Click on the Start button.

- If the system prompts you to "Open YuJa Software Capture", check the box "Always allow...." This will eliminate this box and automatically open the YuJa Software Capture tool in the future.
Then click Open YuJa Software Capture button.
Software Capture Settings
- The YuJa Software Capture window opens.

- YuJa will notifiy you if updates are needed.
Follow these instructions for more details: Updating to the Latest Version of the YuJa Software Capture for PC Application.
Menu

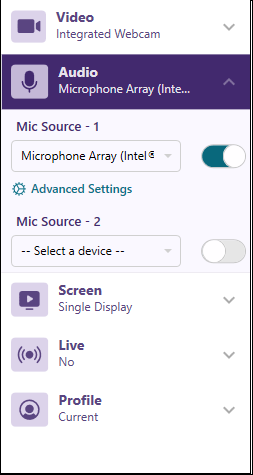
2. Audio: inputs microphone
3. Screen: software on your computer, such as PowerPoint
4. Live stream: we currently do not subscribe to this option
5. Profile: you can change your settings and save as a Profile.
Main Window

Menu Options
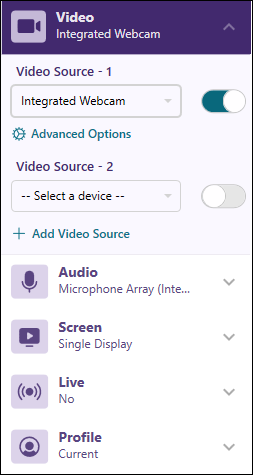
Video
Click on the drop-down arrow next to Video. The first video source will default to your integrated webcam within your device. That may be changed to an external webcam or other video camera within your system. The Video Source 2 must be toggled on to work. This could be an additional front facing webcam to capture the classroom or another video source within your system. If you need assistance setting this up, please contact the ITS Help Desk at 650-5500.
Audio
Screen
The Screen source is your primary computer screen display. If you have more than one monitor, click on Advance Settings and select Duo Displays. If you need assistance setting this up, please contact the ITS Help Desk at 650-5500.
Profile

Record
- Once you have your video, audio, and screen settings saved, click the Start button. Remember, you will be able edit the video when you have finished, so don't worry about extra video at the beginning or end.

YuJa will provide you with a 3 second countdown. Don't worry if you don't start right away. You can later trim off any extra video at the beginning or end. - A small toolbar will appear on your screen. Click the "pause" button if you wish to pause the recording. When you click the pause button again, you will continue with the recording.
Click the "Stop" icon when you are finished recording.
- Click the "Save" button to begin the upload of your video to YuJa.

- A status bar will appear on your screen. When the status reads 100%, return to YuJa for post-production editing/captioning/linking.

YuJa (All Users) - Recording Using the YuJa Software Capture Tool (Mac)
- Log into YuJa at https://siue.yuja.com/.
- Click on Create Recording at the top of the page.

Software Capture Settings

2. If the capture tool is working correctly, there should be a green box at the bottom of the screen that says Online.
Menu

2. Audio: inputs microphone
3. Screen: software on your computer, such as PowerPoint
4. Live stream: we currently do not subscribe to this option
5. Profile: you can change your settings and save as a Profile.
Main Window

Menu Options
Video
Click on the drop-down arrow next to Video. The first video source will default to your integrated webcam within your device. That may be changed to an external webcam or other video camera within your system. The Video Source 2 must be toggled on to work. This could be an additional front facing webcam to capture the classroom or another video source within your system. If you need assistance setting this up, please contact the ITS Help Desk at 650-5500.
Audio


Screen
The Screen source is your primary computer screen display. If you have more than one monitor, click on Advanced Settings and select Duo Displays. If you need assistance setting this up, please contact the ITS Help Desk at 650-5500.
Profile

Record
1. Once you have your video, audio, and screen settings saved, click the Start button. Remember, you will be able edit the video when you have finished, so don't worry about extra video at the beginning or end.
YuJa will provide you with a 3 second countdown. Don't worry if you don't start right away. You can later trim off any extra video at the beginning or end.
2. A small toolbar will appear on your screen. Click the "pause" button if you wish to pause the recording. When you click the pause button again, you will continue with the recording.
Click the "Stop" icon when you are finished recording.
3. Click the "Save" button to begin the upload of your video to YuJa.


YuJa (All Users) - Record Video with YuJa Browser Capture Tool (PC and Mac)
- From the Media Library, click on the Create Recording button.

- Select Browser Capture in the drop down list.

- Click the Start button.

- A new browser window will open with the Browser Capture Studio. On the left are your Browser Capture Options. On the bottom of the new window are the Browser Capture Studio options.

- Recording Options:
Microphone: The available microphones will appear in the expandable menu.
Camera: Display only the default web cam in the record window. To change from one web cam to another, click expand the menu.
Present: A secondary window will appear listing the open tabs and windows available to share during the recording. An option to share your entire screen is available too. You have the option to share audio with tabs only.
PIP: PIP stands for Picture-In-Picture and A window will pop up allowing you to minimize or maximize either the window or tab you are sharing or your camera feed. Select the Window or Screen from the drop down menu
Click the Start Recording button when all options are set. - Record the video. Once the video is complete, click the Stop Recording button.
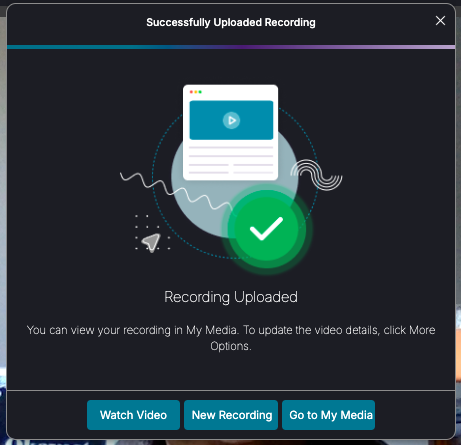
- Once you have finished recording, a new window will pop up with the status of your video's upload to YuJa. Click the Watch Video button to preview your video. Click the New Recording to record another video. Click Go to My Media to visit your media collection on SIUE's YuJa instance.
- When the upload is complete, you can return to the YuJa Media Library to edit your video.
- Make sure that your microphone is working and that both audio and video are recorded.
- Make sure that the proper screen is selected to share in the source pane. Be sure to share your screen/desktop (time and date should be visible in the area recorded).
Additional guidance for quality video and testing environment:- Review the KnowledgeBase article with Tips for Taking Tests, Quizzes, and Surveys.
- Choose a location where you will not be interrupted.
- Turn off all other devices (e.g. tablets, phones, second computers) and place them outside of your reach.
- Clear your area of all external materials not permitted - books, papers, and other devices.
- Before starting the test, know how much time is available for it, and that you've allotted sufficient time to complete it.
- Remain at your computer for the duration of the test.
- Avoid wearing baseball caps or hats with brims.
- Ensure your computer or tablet is on a firm surface. NOT areas where it is likely to move such as a lap or bed.
- Take the exam in a well-lit room and avoid back lighting, such as sitting with your back to a window.
- Click the Start button to begin recording.

Once started, the recording should not be stopped until the exam is completed and has been submitted. - Move the camera around the room to scan the testing environment (360 degrees) – include the desk, scratch paper, and the areas behind the computer.
- Open Blackboard and begin your exam. Note: You may need to enter the password provided to access the exam.
- Submit the exam in Blackboard.
- Click the Stop Recording button.

The video will automatically upload to YuJa in your Manage Media library.
After the Exam
- You will need to share the link to the video with your instructor.
- Navigate to your video thumbnail. Hover your mouse over the thumbnail and click More in the menu.
YuJa (All Users) - Find and Share a Video Link
- Navigate to your video thumbnail. Hover your mouse over the thumbnail and click More in the menu.

- Click on Links from the left menu.

- Under the heading "Enable Auto Single-Sign-On for Embedded and Direct Linked Media" select the Enable radio button. This will allow students to view these videos within Blackboard. Click the Save Links button, but do not close the window.
Click on the Copy icon next to the Direct Link. This will copy the URL to your clipboard on your computer.
- Paste the link in an email, Blackboard discussion post, or other text area. If pasting in a text area in Blackboard, see the instructions for how to hyperlink text to make it easier for others to access your video.
Technical support is not available to resolve problems you may have during the exam. Issues with your local internet connectivity cannot be resolved by SIUE ITS or your instructor.