YuJa (Faculty): Record a Video with Zoom and Post it to Blackboard
Remember to do a short test before recording the actual presentation. Choosing the Record to Cloud option automatically uploads to YuJa, but it could take up to 24 hours to access your recording.
Click the ![]() below to expand the menus for directions.
below to expand the menus for directions.
Step 1: Open Zoom
- Open Zoom/Start a Meeting
-
Zoom updates it's software on a regular basis with important security items as well as updates to features. To make sure you have the most current version, check for updates.
- Open the Zoom application on your computer.
- If prompted to login, choose the SSO option and login with your SIUE e-ID and password.
- Click New Meeting. Note: If you do not want to start with video, click the drop-down next to New Meeting and un-check the box for Start with Video.

- Click Join with Computer Audio to use a computer headset or internal microphone. Or click the Phone Call option to call in with your telephone. You can also check the 'Automatically join computer audio when joining' if you want to save this setting for future meetings.

-
Step 2: Record
- Cloud Option: Record a Meeting on Zoom
-
Zoom updates it's software on a regular basis with important security items as well as updates to features. To make sure you have the most current version, check for updates.
- Once you have started a Zoom meeting, locate the menu at the bottom the Zoom window.

- If you want to show your video, make sure your camera is enabled. Click the Start Video button to enable your camera.

- If you want to record a PowerPoint presentation or actions on your computer, click the Share Screen button.

- This will bring up a new window prompting you to select a window or application to share. Choose what you want to share (i.e. desktop screen) and click the Share button at the bottom-right corner of the window.

- Note the menu moves to the top of the Zoom window when you share your screen.
- To begin recording, click the More button at the top of the Zoom window.
- Choose Record to the Cloud from the drop-down menu.

- A red dot will appear near the top of the screen indicating the recording has started.

- To stop the recording, click the More button at the top of the Zoom window.
- Choose Stop Recording from the drop-down menu.

(NOTE: If you have not shared your screen, the Record/Stop Recording options will be at the bottom of the Zoom window.) - To make more videos, simply Record and Stop Recording again. Each time you Stop Recording, Zoom produces another video file. To take a break in the recording without creating a new video file, use the Pause Recording option instead.
- When you are finished recording, click the More button and then choose End from the drop-down menu to end the meeting. (NOTE: If you have not shared your screen, the End button will be at the bottom of the Zoom window.)

- Click End Meeting for All.

- Zoom will process your recording and automatically upload it to your YuJa account. When your recording is ready, a message will appear in your inbox with the subject line “Your Zoom Meeting is now available in your My Media”. Log in to YuJa to locate your video. It will be automatically uploaded to your Zoom Recordings folder.
NOTE: Please allow up to 24 hours for your recording to process and arrive in your inbox.

- Once you have started a Zoom meeting, locate the menu at the bottom the Zoom window.
-
Step 3: Linking in Blackboard
- Link a YuJa Video using a Weblink and Embedding in Blackboard
-
YuJa provides the full embed code as well as the URL for each video. An embedded video shows the video in a play window rather than just the link. It is a good practice to include the URL along with the Embed code to increase accessibility for mobile devices.

- Navigate to your video thumbnail. Hover your mouse over the thumbnail and click More in the menu.

- Click on Links from the left menu.

- Under the heading "Enable Auto Single-Sign-On for Embedded and Direct Linked Media" select the Enable radio button. This will allow students to view these videos within Blackboard. Click the Save Links button, but do not close the window.
Click on the Copy icon next to the Embed Code. This will copy the code to your clipboard on your computer.
Do not close this window. - Return to Blackboard in a new tab or window. Do not close the YuJa window. Navigate to the Content Area/Folder where you want to link the video. Hover your mouse over the Build Content button. Click on Web Link from the menu.

- Title the video. In the text box, click on the source code icon < >. Continue with the rest of the settings.
Note: The rows of icons are fluid based upon the size of your browser window. The source code icon may appear in the second row or third row.
- The Source Code window opens. Click on the first line. While holding down the Ctrl key on your keyboard, type v. This will paste your code in the box. Click the Save button at the bottom of the window.

- If you want to make the video player window larger, click and hold the blue box in the lower right corner and drag the box to the size you want. Click Submit at the bottom of the page.

- Return to YuJa. Confirm that the "Enable Auto Single-Sign-On for Embedded and Direct Linked Media" Enable radio button is still connected.Copy the Direct Link by clicking on the Copy icon.

- Return to Blackboard. Paste the Direct Link into the URL box.

- Click Submit at the bottom of the page.
- Students now have the embedded video to view, and the direct link to the video.
- Navigate to your video thumbnail. Hover your mouse over the thumbnail and click More in the menu.
-
- Add Video to Blackboard for Grading the Percent Watched
-
YuJa will grade the percentage watched of a video. There are two options. If this video is worth 20 possible points:
- Give full credit based on percentage watched. For example: if a student watched 90% of the video, they will get 20 points.
- Give credit based on percentage watched. For example: if a student watches only 50% of the video, they will get only 10 points.
-
- Navigate to the video. Hover your mouse over the thumbnail and click More in the menu that appears.

- In the Media Details pop-up page, click on the Quizzes tab. Then click on Create Playback Quiz.

- Title the quiz. This will the the name of the link of the video.
Click the first radio button for the student to receive full credit based on the percentage you designate.
Or click on the second radio button to give credit based on how much of the video the students watched.
Click the Create button at the bottom of the window.
- Return to Blackboard.
Deploy a YuJa Video Quiz in Blackboard
These instructions assume that the quiz has already been created in YuJa.
- In Blackboard, navigate to the course. Then navigate to the Content Area or folder.
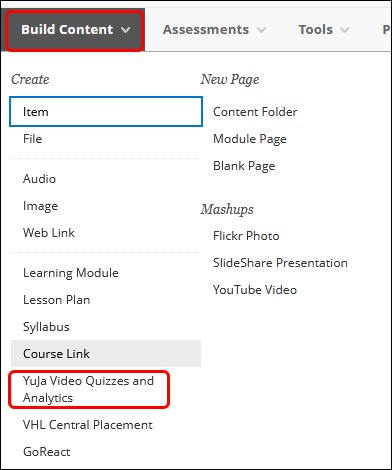
- Click on Build Content. Then click YuJa Video Quizzes and Analytics in the menu.
- From the Media Chooser, click on the Quizzes tab.

- Locate the quiz and click on it to select it. Click the Insert Content button at the bottom of the window.

- The video will appear as a Web Link. Click the Drop-down arrow next to the title.

- Edit the name of the video if necessary. The score will default to 100. Change that if necessary. Set the Due Date and other settings as necessary. It is good practice to add instructions that include the due date and points possible for the video quiz.

- Submit at the bottom of the page.

Note: The grades may not transfer to the Grade Center immediately, especially the Analytics scores. Please allow extra time for those to transfer to the Grade Center. - In Blackboard, navigate to the course. Then navigate to the Content Area or folder.
- Navigate to the video. Hover your mouse over the thumbnail and click More in the menu that appears.
Note: when students start viewing the video, the grades will not appear instantaneously. It may take a few minutes up to an hour for the grades to appear.
-
- Deploy a YuJa Video Quiz
-
These instructions assume that the quiz has already been created in YuJa.
- In Blackboard, navigate to the course. Then navigate to the Content Area or folder.
- Click on Build Content. Then click YuJa Video Quizzes and Analytics in the menu.
- From the Media Chooser, click on the Quizzes tab.
- Locate the quiz and click on it to select it. Click the Insert Content button at the bottom of the window.
- The video will appear as a Web Link. Click the Drop-down arrow next to the title.
- Edit the name of the video if necessary. The score will default to 100. Change that if necessary. Set the Due Date and other settings as necessary. It is good practice to add instructions that include the due date and points possible for the video quiz.
- Submit at the bottom of the page.
Note: The grades may not transfer to the Grade Center immediately, especially the Analytics scores. Please allow extra time for those to transfer to the Grade Center. - In Blackboard, navigate to the course. Then navigate to the Content Area or folder.
-
- Link a YuJa Folder in Blackboard
-
There are two ways to link to a YuJa folder:
- Web Link
- Embed

Embedded videos take up more space but give the student a quick glance at the videos to watch. IMPORTANT:Neither quiz results nor analytics will be recorded when linking a folder. If you wish to use quizzes and record analytics, you must use the YuJa LTI link in the Build Content menu for each individual video.
Creating a Web Link in Blackboard
- In YuJa, navigate to the folder.
- Hover your mouse over the folder.
- Click on the cog icon.
- Click on More in the menu.

- From the left menu, click on Links.

- To create a link in Blackboard, click on the Copy icon next to the Direct Link.

- Return to Blackboard. Navigate to the Content Area or folder to which you wish the folder link to reside.
- From the menu, click on the Build Content button. Then from the menu, click on Web Link.

- Give a name that describes the videos. Click your mouse in the URL box. Hold the CTRL key down while typing the letter v. This will paste the Direct Link URL into the box.

- Complete the remaining setting as needed. Click Submit at the bottom of the page.
Create an Embedded Box of Video Thumbnails in Blackboard
- In YuJa, navigate to the folder.
- Hover your mouse over the folder.
- Click on the cog icon.
- Click on More in the menu.
- From the left menu, click on Links.

- Click on the Copy button for the Embed Code.

- Return to Blackboard. Navigate to the Content Area or folder to which you wish the folder link to reside.
- From the menu, click on the Build Content button. Then from the menu, click on Item.

- Name the link. Then click on the source code button. It looks like less than/greater than symbols. < >. Note, the number of rows of icons will be different depending upon how large your browser window is set at.

- When the Source code window opens, click your mouse on the first line. Then hold the Ctrl key down while typing the letter v.
Click Save at the bottom of the window.
- Complete the remaining settings as needed. Click Submit at the bottom of the page.
-