Microsoft Teams - Meeting Workflow for Meeting With Students
Is there an existing Team?
Existing Team - Yes
I am recording the meeting:
Set up the YuJa Plugin
- Log in to Microsoft Teams.
- Navigate to the desired team.
- Navigate to the General channel.
- Click the + in the tabs at the top of the channel.

- Search for YuJa within the search bar.
- Click the YuJa plugin.

- Click the check box to post to the channel if desired.
- Click Save.

- Choose on the tab if you want recordings to be auto-synced or manually synced. Note: Auto-sync recordings sync every 3 hours. To get them to YuJa sooner, choose to manually sync. This option can be toggled back and forth as needed.

Schedule the meeting and assoicate it with a channel
Scheduling a meeting In A Channel:
- Click Teams in the left sidebar.
- Select the channel.
- Select New meeting at the top right (camera icon).
- Fill in the details (title, participants, date, time).
- For recurring meetings, click the drop-down next to Does not repeat and select the appropriate option. Fill in the information as desired.
- Click Send.
Schedule a Meeting in the Teams Calendar:
- Click Calendar in the left sidebar.
- Select New meeting at the top right.
- Select Schedule Meeting in the drop down menu.
- Fill in the details (title, participants, date, time).
- For recurring meetings, click the drop-down next to Does not repeat and select the appropriate option. Fill in the information as desired.
- Click Save.
Schedule a Meeting in Chat
- In a chat message bar, click the + button in the compose box
- Click Schedule meeting.
- Fill in the details (title, participants, date, time).
- For recurring meetings, click the drop-down next to Does not repeat and select the appropriate option. Fill in the information as desired.
- Click Send.
Schedule a Meeting in Microsoft Outlook
- In Outlook, choose Teams Meeting at the top ribbon or when creating an event.
- Fill in the details (title, participants, date, time).
- To copy the invitation link:
- The meeting link will appear as a URL. Select Copy to copy the URL.
- Paste the URL into an email or chat message.
Joining a meeting:
- From Calendar: Click the meeting and select Join.
- From Chat: Click the meeting notification and select Join.
- From an invite: Click the Join Microsoft Teams Meeting link.
Quick join options:
- Use the Join button next to a meeting in your Calendar.
- Click Join on a meeting reminder pop-up.
Tips:
- Use Meet now in a channel for immediate meetings.
- Adjust audio/video settings before joining.
- Use the lobby for meeting security.
- If you are not able to join via video, you can call-in.
For more details, see Microsoft's guides:
- Scheduling: Schedule a meeting in Microsoft Teams
- Joining: Join a meeting in Microsoft Teams
Record the meeting
Where the meeting is started depends on where the recordings will be stored.

- In a meeting, click More actions (...)
- Select Start recording
- To stop, click More actions (...) again and select Stop recording
Tips for recording:
- Inform participants that the meeting is being recorded (they will still receive a notification formally in the meeting)
- Recordings are saved to Microsoft Stream (or OneDrive/SharePoint) unless it is a team meeting where the YuJa plugin has been set up
- Stream will delete videos after 180 days unless the expiration date is removed
- Only organizers and presenters can start/stop recordings
Videos from Stream or OneDrive can be downloaded and uploaded to YuJa.
Workflow for Recording
If you need help deciding how to schedule the meeting and record, try these workflow articles:
Find the link in YuJa and share it
- Navigate to your video thumbnail. Hover your mouse over the thumbnail and click More in the menu.

- Click on Links from the left menu.

- Under the heading "Enable Auto Single-Sign-On for Embedded and Direct Linked Media" toggle to Enabled. This will allow students to view these videos within Blackboard. Click the Save Links button, but do not close the window.
Click on the Copy icon next to the Direct Link. This will copy the URL to your clipboard on your computer.
- Paste the link in an email, Blackboard discussion post, or other text area. If pasting in a text area in Blackboard, see the instructions for how to hyperlink text to make it easier for others to access your video.
I am not recording the meeting.
Schedule the meeting
Scheduling a meeting In A Channel:
- Click Teams in the left sidebar.
- Select the channel.
- Select New meeting at the top right (camera icon).
- Fill in the details (title, participants, date, time).
- For recurring meetings, click the drop-down next to Does not repeat and select the appropriate option. Fill in the information as desired.
- Click Send.
Schedule a Meeting in the Teams Calendar:
- Click Calendar in the left sidebar.
- Select New meeting at the top right.
- Select Schedule Meeting in the drop down menu.
- Fill in the details (title, participants, date, time).
- For recurring meetings, click the drop-down next to Does not repeat and select the appropriate option. Fill in the information as desired.
- Click Save.
Schedule a Meeting in Chat
- In a chat message bar, click the + button in the compose box
- Click Schedule meeting.
- Fill in the details (title, participants, date, time).
- For recurring meetings, click the drop-down next to Does not repeat and select the appropriate option. Fill in the information as desired.
- Click Send.
Schedule a Meeting in Microsoft Outlook
- In Outlook, choose Teams Meeting at the top ribbon or when creating an event.
- Fill in the details (title, participants, date, time).
- To copy the invitation link:
- The meeting link will appear as a URL. Select Copy to copy the URL.
- Paste the URL into an email or chat message.
Joining a meeting:
- From Calendar: Click the meeting and select Join.
- From Chat: Click the meeting notification and select Join.
- From an invite: Click the Join Microsoft Teams Meeting link.
Quick join options:
- Use the Join button next to a meeting in your Calendar.
- Click Join on a meeting reminder pop-up.
Tips:
- Use Meet now in a channel for immediate meetings.
- Adjust audio/video settings before joining.
- Use the lobby for meeting security.
- If you are not able to join via video, you can call-in.
For more details, see Microsoft's guides:
- Scheduling: Schedule a meeting in Microsoft Teams
- Joining: Join a meeting in Microsoft Teams
OR
Start a Meeting in Chat
If a chat conversation would be better as a discussion, meetings, audio call, and video call can all be made from the Chat area.
Schedule a Meeting
A full Teams meeting can be scheduled with the users in the Chat. Use the meeting option to share your screen or when you need the full Teams Meeting options.
- From the chat message bar, click the + (plus) to expand the menu.
- Select Schedule meeting.

- Fill out the necessary information for the meeting.
Audio/Video Call
Use audio call or video call for instant communication if all the Teams Meeting options are not necessary.
- Click on the phone handset icon at the top of the page.
- Select Audio Call or Video Call.

An audio call requires only a microphone and speaker or headset. A video call requires a microphone, speaker or headset, and a webcam.
Existing Team - No
I am recording the meeting.
Schedule the meeting
Scheduling a meeting In A Channel:
- Click Teams in the left sidebar.
- Select the channel.
- Select New meeting at the top right (camera icon).
- Fill in the details (title, participants, date, time).
- For recurring meetings, click the drop-down next to Does not repeat and select the appropriate option. Fill in the information as desired.
- Click Send.
Schedule a Meeting in the Teams Calendar:
- Click Calendar in the left sidebar.
- Select New meeting at the top right.
- Select Schedule Meeting in the drop down menu.
- Fill in the details (title, participants, date, time).
- For recurring meetings, click the drop-down next to Does not repeat and select the appropriate option. Fill in the information as desired.
- Click Save.
Schedule a Meeting in Chat
- In a chat message bar, click the + button in the compose box
- Click Schedule meeting.
- Fill in the details (title, participants, date, time).
- For recurring meetings, click the drop-down next to Does not repeat and select the appropriate option. Fill in the information as desired.
- Click Send.
Schedule a Meeting in Microsoft Outlook
- In Outlook, choose Teams Meeting at the top ribbon or when creating an event.
- Fill in the details (title, participants, date, time).
- To copy the invitation link:
- The meeting link will appear as a URL. Select Copy to copy the URL.
- Paste the URL into an email or chat message.
Joining a meeting:
- From Calendar: Click the meeting and select Join.
- From Chat: Click the meeting notification and select Join.
- From an invite: Click the Join Microsoft Teams Meeting link.
Quick join options:
- Use the Join button next to a meeting in your Calendar.
- Click Join on a meeting reminder pop-up.
Tips:
- Use Meet now in a channel for immediate meetings.
- Adjust audio/video settings before joining.
- Use the lobby for meeting security.
- If you are not able to join via video, you can call-in.
For more details, see Microsoft's guides:
- Scheduling: Schedule a meeting in Microsoft Teams
- Joining: Join a meeting in Microsoft Teams
Record the meeting
Where the meeting is started depends on where the recordings will be stored.
- In a meeting, click More actions (...)
- Select Start recording
- To stop, click More actions (...) again and select Stop recording
Tips for recording:
- Inform participants that the meeting is being recorded (they will still receive a notification formally in the meeting)
- Recordings are saved to Microsoft Stream (or OneDrive/SharePoint) unless it is a team meeting where the YuJa plugin has been set up
- Stream will delete videos after 180 days unless the expiration date is removed
- Only organizers and presenters can start/stop recordings
Videos from Stream or OneDrive can be downloaded and uploaded to YuJa.
Workflow for Recording
If you need help deciding how to schedule the meeting and record, try these workflow articles:
Find the recording in Stream and download it
All videos that are recorded on Teams are located in Microsoft Stream. Access Stream from the waffle icon when you login to Office 365.
- Locate the video in Stream.
- Click on the 3-dot menu and select Download.

- If you do not see a download button in the menu, click the 3-dot menu and select Open.

- Click the 3-dot menu and select Download.

Upload Media to YuJa
SIUE licenses YuJa for video storage and streaming. Click on the (+) plus below to open the instructions for uploading your video to YuJa.
Upload Media to YuJa
Upload Media
- If you haven't already, create folders to keep your media organized. See the Knowledge Base Article "Create a Folder" for more information.
- Navigate to the folder in which you will upload your media. Double click on that folder.
- Drag and drop your media directly into the window or click the Upload button.

4. If you are uploading video, make sure the "Video" icon is selected. If you are uploading audio, make sure the "Audio" icon is selected.
*Avoid using YuJa for uploading documents; OneDrive is a better storage solution for documents.
5. Drag and drop your media into the box or click the upload button. Navigate to your media file and upload it.
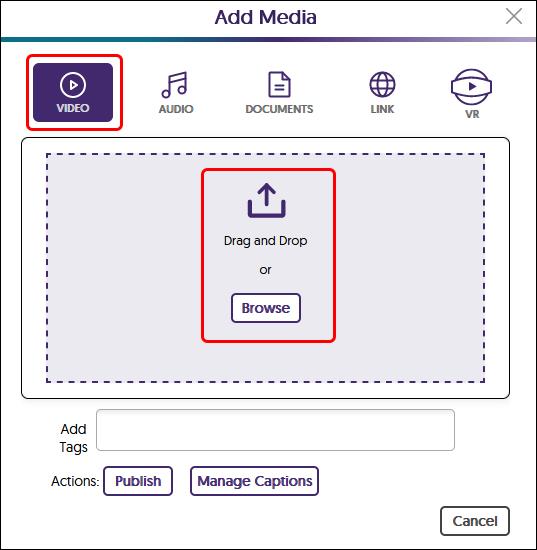
6. Please wait until the status window at the bottom of the page states Finished Uploading. This upload process may take some time depending upon the size of your media. Once the upload is finished, you will see a thumbnail of the media processing. Do not do anything to that media until it is finished processing. You may upload more media or do other actions while that video is processing.
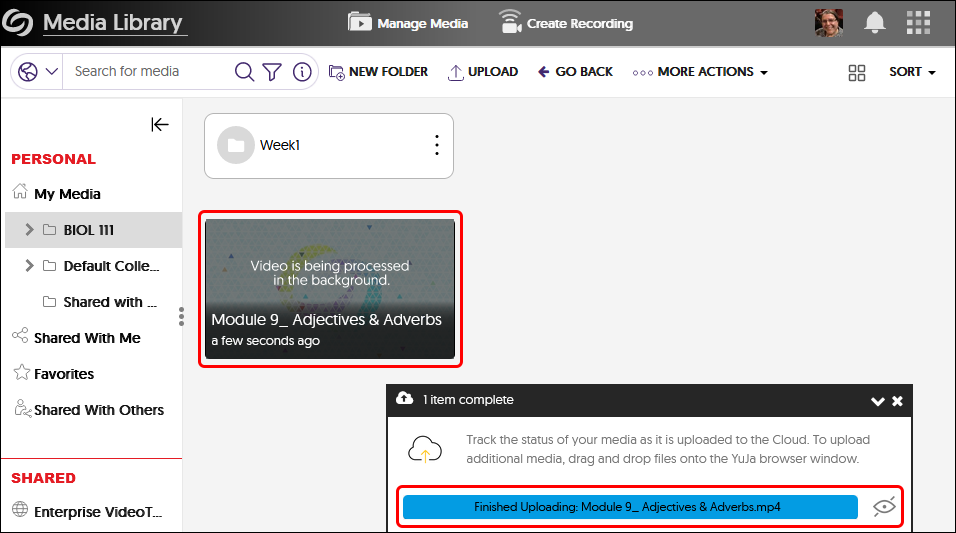
7. Once the media is processed, you will see a thumbnail image, the length of media ("4:39" in image below), and length of time since upload ("3 minutes ago" in the image below).
Once the media is uploaded, you may continue editing, linking, sharing, etc.
Upload the recording to YuJa
Upload Media
- If you haven't already, create folders to keep your media organized. See the Knowledge Base Article "Create a Folder" for more information.
- Navigate to the folder in which you will upload your media. Double click on that folder.
- Drag and drop your media directly into the window or click the Upload button.
4. If you are uploading video, make sure the "Video" icon is selected. If you are uploading audio, make sure the "Audio" icon is selected.
*Avoid using YuJa for uploading documents; OneDrive is a better storage solution for documents.
5. Drag and drop your media into the box or click the upload button. Navigate to your media file and upload it.
6. Please wait until the status window at the bottom of the page states Finished Uploading. This upload process may take some time depending upon the size of your media. Once the upload is finished, you will see a thumbnail of the media processing. Do not do anything to that media until it is finished processing. You may upload more media or do other actions while that video is processing.
7. Once the media is processed, you will see a thumbnail image, the length of media ("4:39" in image below), and length of time since upload ("3 minutes ago" in the image below).
Once the media is uploaded, you may continue editing, linking, sharing, etc.
Share the YuJa Link
- Navigate to your video thumbnail. Hover your mouse over the thumbnail and click More in the menu.
- Click on Links from the left menu.
- Under the heading "Enable Auto Single-Sign-On for Embedded and Direct Linked Media" toggle to Enabled. This will allow students to view these videos within Blackboard. Click the Save Links button, but do not close the window.
Click on the Copy icon next to the Direct Link. This will copy the URL to your clipboard on your computer. - Paste the link in an email, Blackboard discussion post, or other text area. If pasting in a text area in Blackboard, see the instructions for how to hyperlink text to make it easier for others to access your video.
I am not recording the meeting.
Schedule Class Sessions/Office Hours and Post the Link to Blackboard
Schedule Meeting
- Navigate to Microsoft Teams in the desktop app or a browser.
- Click Calendar in the left app bar.
- Click the drop-down arrow next to New.
- Click Event.

- Click the Series button to enable a Recurring meeting.
- Enable the Teams meeting option.

- Add a descriptive title.
- Click the Date and Time field to expand the field of options.
- Choose the Start date, Start time, End time, recurring pattern, and ending date.

- Click Save.

- Optionally, set the meeting options by clicking 'Options' to the right of Teams Meeting.

Copy Link
- Double-click the event created in the steps above.
- Click the drop-down arrow next to the Share button.
- Click the Copy join link button.

Create Web Link in Blackboard
- Navigate to Blackboard and the content area where the web link will be created.
- Hover over Build Content.
- Click Web Link.
- Type a title in the Name box (i.e. Link for synchronous class sessions).
- Paste the URL in the URL box.
- Type a description in the text field. Optional: Go back to the calendar event and copy and paste the entire invitation to allow students to dial into the meeting. (see sample)

- Click Submit.