Blackboard (Faculty) - Assignments: Grade a Blackboard Assignment
This document provides an overview of grading a Blackboard assignment.
Accessing the Blackboard Assignment
- From the Control Panel, click on Grade Center, then click Needs Grading.
- Click the student's name under "User Attempt."
OR
- From the Control Panel, click Grade Center, then click Full Grade Center.
- Navigate to the cell for the student and assignment you want to grade. Click the drop-down arrow next to the yellow exclamation point.
- Click Attempt + DATE.
Note: You may see a brief note that the file is rendering. This is normal. If the page does not automatically update you may need to refresh your page in order for the file to display.
Using Inline Grading Tools
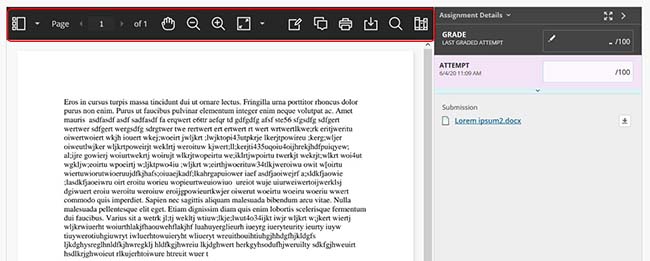
- The student's file will be displayed for you and you will have the ability to grade directly on it.
- To reveal all the grading icons close the Grading panel by clicking on the arrow.

- To see a thumbnail of each page, click on the Thumbnail icon. Click on each page for easy navigation. Click the Thumbnail icon again to close the Thumbnail panel.
- Use the left and right arrows to go to the next or previous pages of a multi-page document. These will not function if there is only one page.
- Use the Pan hand to move the page with your mouse.

- Use the magnifying glasses to zoom into the document (+) or zoom out (-).

- Use the Fit Page icon to adjust the page to Fit Page in the window, fit the width of the page in the window, or for the best fit of the page in the window.
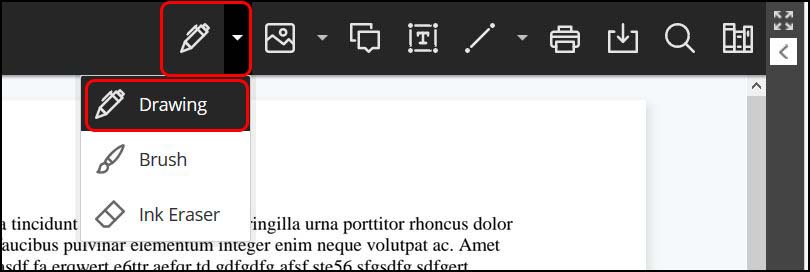
- Click on the Pen icon to access the Drawing, Brush, or Ink Erase tools.
- The Drawing tool allows you to draw free-hand on the paper. Use the Erase Ink tool to remove part or all of the drawing.
- The Brush tool allows you to draw a wider swatch of color, for example, to highlight text. Use the Erase Ink tool to remove part or all of the brush strokes.
- Click on the Image icon to display the Image tool and the Stamp tool.
- The Image tool allows you to upload an image onto the paper.
- The Stamp tool allows you to embed a pre-designed stamp or create a custom stamp for the paper.
- The Shape icon allows you to select a variety of shapes to add to the paper.
- Click the Print icon to send the paper to a printer.
- Click the Download icon to download the paper with all notations to a PDF file.

- Click the Search icon to open a search box. Type in the search term in the box provided. Click the Close button to close the search box.
- Click the Content Library to open the Content Library panel. This is a repository of content you often use to grade papers, such as frequently used comments. Click the Plus button to create and add content. These comments will be available across all assignments.
- Add a grade to the Attempt box. To leave comments for the overall paper, click on the blue bar/arrow.
- Leave comments to the student in the Feedback to Learner box. Click Submit when you are finished. The Grade will not be submitted to the Grade Center until you click the Submit button.

- The "Add Notes" button is a private notes area for the grader that is not feedback to the learner.
See Also
- Blackboard (Faculty) - Assignments: About Blackboard Assignments
- Blackboard (Faculty) - Assignments: Create a Blackboard Assignment
- Blackboard (Faculty) - Assignments: Download Assignment Files
- Blackboard (Faculty) - Groups: Grade a Group Assignment
- Blackboard (Faculty) - Assignments: View Students' Blackboard Assignment Submission Receipts
- Blackboard (Faculty) - Grade Center: View Grade Details, Clear, Ignore, and Allow Additional Attempt


